Squats are the most functional exercise you can do. Every time you sit down, stand up, pick something off the floor, or get out of a car, you’re doing some version of a squat. Avoiding squats because of knee pain actually makes the problem worse over time because the muscles that protect your knee joint (quadriceps, glutes, hamstrings) weaken without this fundamental movement pattern.
The answer isn’t to stop squatting. It’s to squat within a range and technique that strengthens your legs without aggravating your knees.
Before starting any new exercise routine, talk to your doctor, especially if you have diagnosed knee arthritis, recent injuries, or balance concerns that could affect your safety during squatting movements.
Why Squats Hurt Your Knees (and How to Fix It)
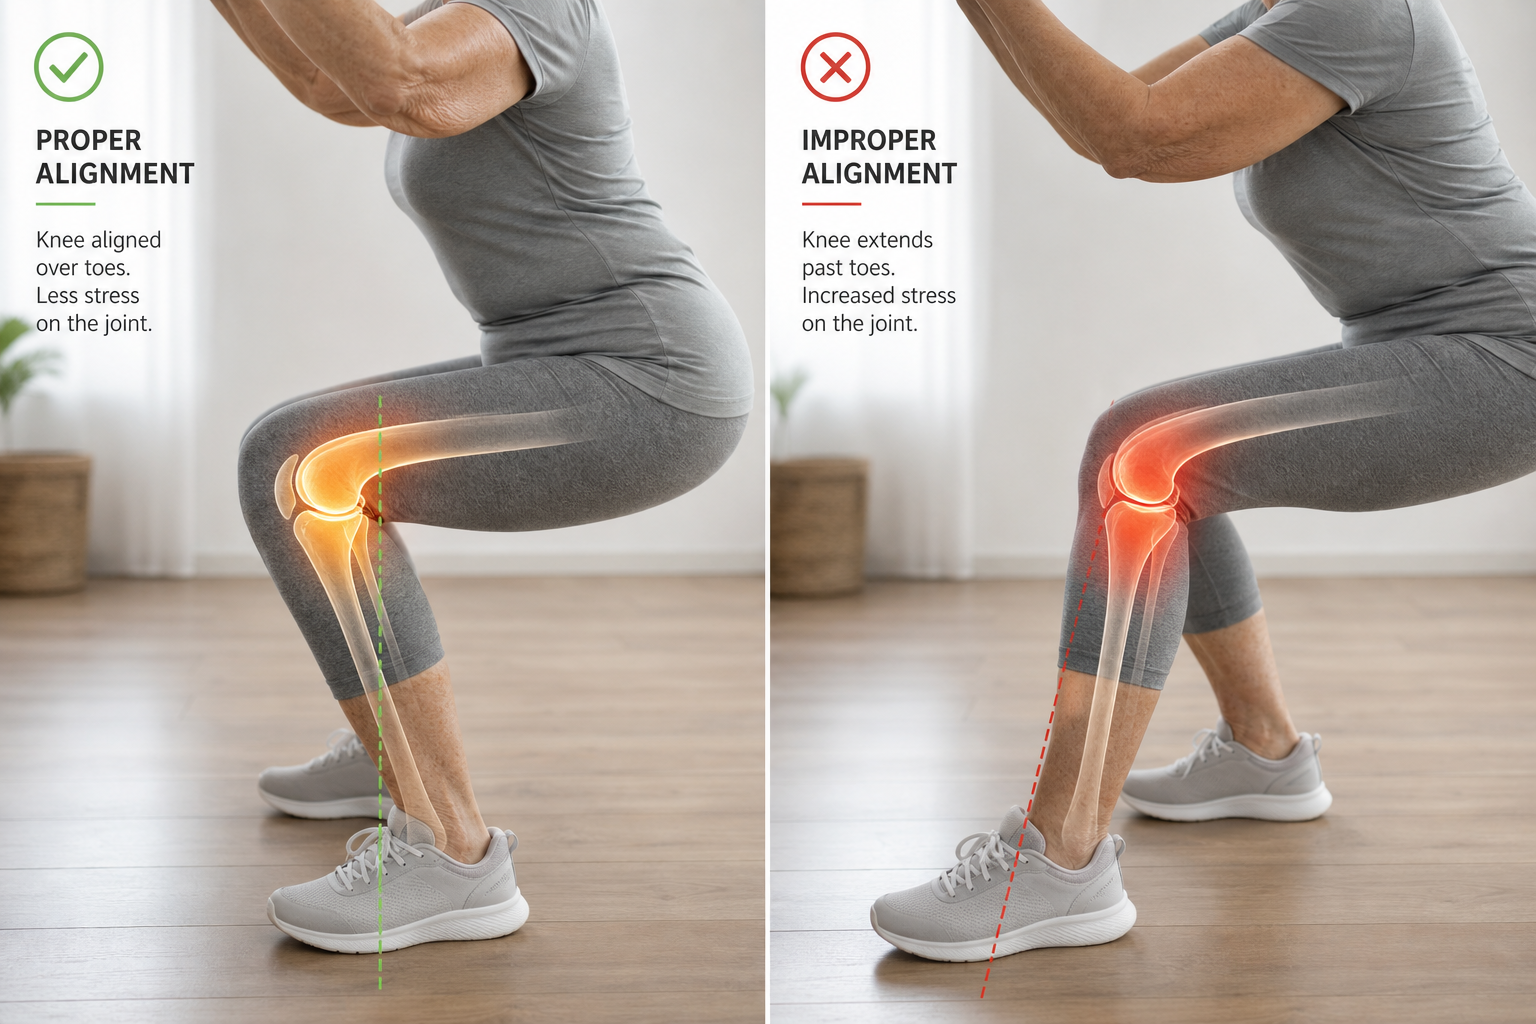
Problem: Going Too Deep
The force on your kneecap (patellofemoral compression) increases exponentially as your knee bends past 90 degrees. At full depth (thighs below parallel), the kneecap force is 7-8 times your body weight. At 60-70 degrees of bend (a partial squat), the force drops to 3-4 times body weight. That’s a massive difference for an arthritic knee.
The fix: Limit your squat depth to 45-70 degrees of knee bend. Place a sturdy chair behind you as a depth guide. When your buttock touches the chair, stop and stand back up. This “box squat” technique gives you a consistent, safe depth.
The chair method also removes the guesswork. Without a depth marker, many people squat lower than they intend, especially as they fatigue. The tactile cue of the chair touching your buttock ensures every repetition stays in the safe zone. Use a dining chair or a weight bench. Avoid low sofas or stools that force a deeper squat.
Problem: Knees Caving Inward
When your glutes are weak, your knees collapse inward during the squat (called valgus). This applies shearing force to the inner knee structures (medial meniscus, MCL) and overloads the outer kneecap facet. It’s a common pattern in seniors with hip weakness.
The fix: Place a mini loop resistance band around your thighs just above the knees. Press outward against the band throughout the squat. This activates your glutes and prevents the knee-caving pattern. Even without the band, consciously push your knees outward over your toes during every repetition.

Mini Loop Resistance Bands
Essential for preventing knee valgus and activating glutes during squats
If you don’t have a band, use the mirror check. Face a mirror during your squat practice. Watch your knees throughout the movement. They should track in line with your toes, not dive toward each other. If you see inward collapse, pause and reset. Focus on pushing your knees outward deliberately. This pattern takes weeks to retrain, so patience matters here.
The band provides immediate feedback. You’ll feel the tension reminding you to push outward. Start with the lightest resistance band available. Heavy resistance makes the squat harder overall, and right now you’re retraining movement quality, not chasing muscular burn.
Problem: Weight on the Toes
Shifting forward onto your toes during a squat increases the load on the kneecap and the patellar tendon. You might notice your heels lifting or your knees shooting forward past your toes.
The fix: Drive through your heels throughout the entire movement. Before you start, wiggle your toes inside your shoes to confirm they’re not gripping the floor (gripping means you’re leaning forward). Think about “sitting back” into the squat as if lowering yourself toward a chair behind you. Your weight should stay centered over your midfoot to heels.
Some people find it helpful to practice squats in socks or barefoot (on a non-slip surface) to feel the weight distribution better. Shoes with elevated heels or thick cushioning can mask the forward shift. If you feel your heels wanting to rise, stop at that depth. That’s your current mobility limit, and forcing deeper creates the toe-loading problem.
Ankle stiffness often contributes to this issue. If your ankles don’t bend easily, your body compensates by shifting forward. Calf stretches (holding a wall-supported calf stretch for 30 seconds per side, twice daily) can improve ankle mobility over time, which lets you sit back more naturally during squats.
Problem: Bouncing at the Bottom
Dropping quickly into the squat and bouncing off the bottom position creates a sudden spike in joint compression. This is especially damaging for arthritic knees with worn cartilage that can’t cushion the impact.
The fix: Lower yourself slowly over 3-4 seconds. Pause briefly at the bottom (1-2 seconds) before standing. This controlled tempo eliminates the bounce, reduces peak joint forces, and actually makes the exercise more effective for building strength because your muscles work harder without momentum assistance.
Count the descent out loud: “one, two, three, touch.” The verbal counting keeps you honest about the tempo. Many people think they’re moving slowly but actually drop in half the time. The pause at the bottom is non-negotiable. That pause is where you prove you’re in control of the movement, not relying on a reflex bounce.
Standing up can be faster (2 seconds), but don’t explode upward. A steady, controlled rise protects the joint while still building strength effectively.
Problem: Foot Position Errors
Foot width and angle change how forces distribute across your knee. Feet too narrow forces your knees to travel farther forward. Toes pointing too far outward can strain the inner knee. Toes pointing straight ahead may not match your natural hip structure.
The fix: Start with feet shoulder-width apart, toes angled outward 10-15 degrees. This matches most people’s natural hip anatomy. Your knees should track over your second and third toes throughout the squat. If this position feels awkward, adjust slightly wider or narrower in small increments.
A simple test: stand naturally, then jump a few inches off the ground. When you land, note where your feet are. That’s often your body’s preferred squat stance. Use that width and toe angle as your starting point.
5 Squat Variations Ranked by Knee-Friendliness
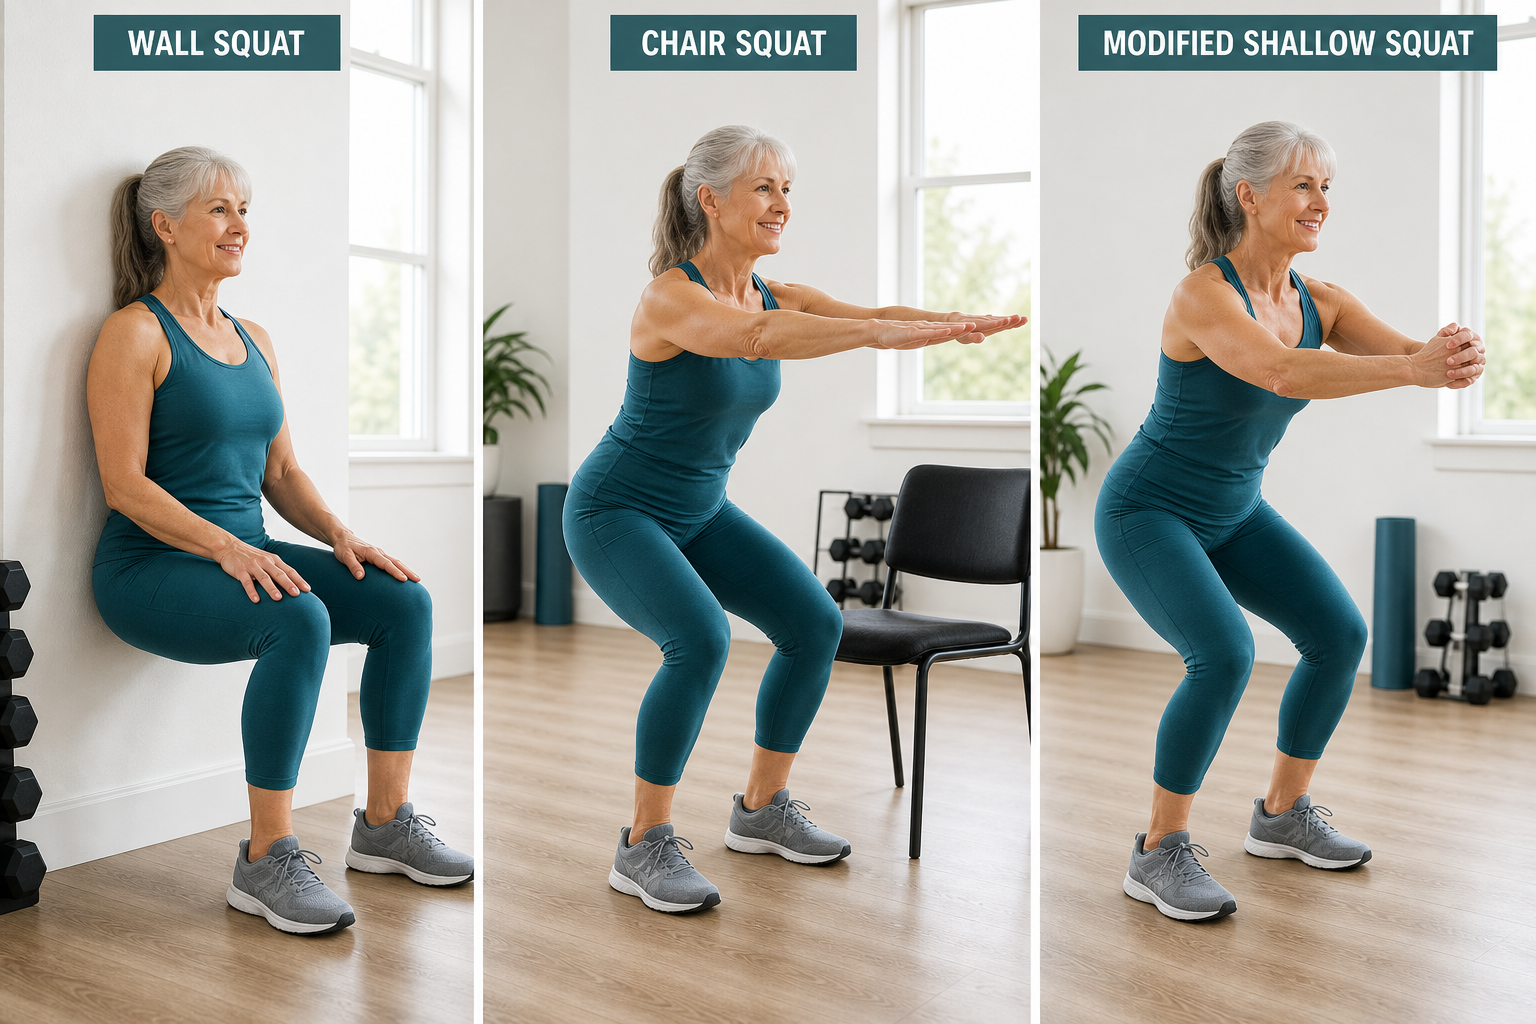
1. Wall Sit (Lowest Knee Stress)
Stand with your back against a wall. Slide down to a comfortable depth (45-60 degree knee bend). Hold for 15-30 seconds. Return to standing. 3 holds. The wall eliminates balance demands and ensures your weight stays on your heels. Your knees stay directly above your ankles, minimizing forward knee stress.
Wall sits are isometric, meaning your muscles work without joint movement. This builds strength without the repetitive compression of up-and-down squatting. If 15 seconds feels too hard, start with 10. If 30 seconds is easy, progress to 45 seconds before moving to the next variation.
Position your feet 12-18 inches away from the wall before sliding down. Feet too close forces your knees forward. Too far back and you’ll slide down the wall uncontrollably.
2. Chair Squat with Hand Assist
Stand in front of a sturdy chair. Lower yourself until your buttock touches the seat, using your hands on the armrests or a counter for light assistance. Stand back up. 3 sets of 8-10. The chair provides a depth guide and the hand assist reduces the load on your knees during the hardest part of the movement. If you prefer seated exercises, you can also explore chair-based knee strengthening movements as a complement to your routine.
The hand assist should be light. You’re using your arms for balance and a bit of help on the way up, not hauling yourself out of the chair with arm strength. If you’re pulling hard with your arms, the chair might be too low. Try a higher surface like a kitchen counter for hand placement while using a dining chair as the depth marker.
Rest 60-90 seconds between sets. Shorter rest doesn’t make the exercise more effective. It just increases fatigue, which degrades form.
3. Chair Squat Without Hands
Same as above, but cross your arms over your chest. Your legs do all the work. 3 sets of 8-10. Progress to this version once you can do 3 sets of 12 with hand assist.
Crossing your arms removes the balance crutch. You’ll notice immediately if you’re leaning too far forward or shifting weight onto your toes, because you’ll feel unsteady. That feedback makes you a better squatter.
If balance is a concern even with the chair behind you, keep the hand assist version in your routine. There’s no shame in using assistance that keeps you safe. Falling is far worse than taking longer to progress.
4. Goblet Squat with Light Weight
Hold a light dumbbell (5-10 pounds) at your chest with both hands. The weight acts as a counterbalance that actually makes it easier to sit back into the squat without leaning forward. Perform controlled squats to chair depth. 3 sets of 8-10.
The goblet position (weight held at chest height) shifts your center of gravity slightly forward, which paradoxically lets you sit back more easily. You’ll find your torso stays more upright compared to bodyweight squats where you might tip forward.
Use a dumbbell, kettlebell, or even a gallon water jug. The implement doesn’t matter. What matters is holding it close to your chest, not letting it drift forward away from your body. When you’re ready to increase resistance further, consider following safe weight progression guidelines to avoid overloading your joints.
If you don’t have weights, this variation isn’t essential. It’s a helpful middle step for some people, but you can skip it and progress from chair squats without hands directly to free-standing bodyweight squats.
5. Bodyweight Squat (Free-Standing)
No chair, no wall, no hand assist. Feet shoulder-width apart, squat to 60-70 degree knee bend and return. 3 sets of 10. This is the most challenging variation because it requires the most balance, strength, and body control. Progress here only when easier variations feel comfortable.
The free-standing squat is the goal, but it’s not a requirement for functional fitness. If chair squats without hands serve you well for daily activities (getting out of chairs, off the toilet, into the car), you don’t need to progress further. Form and safety beat arbitrary progression every time. Once you’ve mastered bodyweight movements, you might explore more advanced leg strengthening techniques for continued progression.
When to Stop a Repetition
Sharp pain is a stop signal. Dull muscle fatigue is normal. Learn the difference. Sharp pain feels localized, sudden, and makes you wince. Muscle fatigue is a burning sensation that spreads across the thigh and builds gradually.
If you feel sharp pain in the knee during a squat, stop that set. Note the depth where pain started. Next session, don’t go that deep. If pain persists at shallower depths, stop squatting and consult a physical therapist.
Clicking or popping without pain is usually harmless. Many knees click. If the click comes with pain or the knee feels like it’s catching or locking, that’s worth getting checked.
Swelling after squatting suggests you’ve exceeded your knee’s current tolerance. Ice the knee for 15 minutes, rest for a few days, and when you return to squats, reduce your depth or the number of sets.
How Often to Squat
Perform squats 3 times per week with at least one rest day between sessions. Your knees need 48 hours to recover from the loading stimulus. On rest days, gentle walking and stretching (hamstrings, hip flexors, calves) support recovery without additional knee stress.
Three times per week is the research-supported frequency for building and maintaining leg strength in older adults. More frequent squatting doesn’t accelerate results. It increases injury risk by not allowing adequate recovery.
You can alternate squat days with upper body exercises (wall pushups, resistance band rows) to stay active on non-squat days without overloading your knees.
Warming Up Before Squats