Your glutes do a lot more than fill out a pair of jeans. They’re the engine behind nearly every lower-body movement you make, from standing up from a chair to walking across a parking lot to catching yourself when you stumble. When that engine loses power, everything connected to it starts to compensate, and that’s when knees, hips, and the lower back begin to complain.
The encouraging part is that glute strength responds well to training at any age. You don’t need heavy weights, a gym membership, or an intense program. A few targeted exercises done consistently, with good form, can meaningfully improve your balance, ease up joint stress, and make everyday movement feel more controlled and confident. Here’s a practical guide to getting started.
Why Hip and Glute Strength Matter More as You Age
The gluteal muscles, which include the gluteus maximus, medius, and minimus, work together to stabilize your pelvis, extend your hip, and keep your leg tracking properly when you walk or stand on one foot. When they’re strong and active, they share the load with your knees and lower back. When they’re underactive, those joints take on more than they should.
Research consistently links hip abductor and extensor weakness to increased fall risk in older adults. That makes sense when you think about it: every step you take involves a brief moment where all your weight is on one leg. If your hip stabilizers can’t hold your pelvis level during that moment, your balance wavers. Over time, that instability adds up.
It’s also worth separating a common misconception here. Glutes don’t simply “switch off” with age on their own. They tend to become underused due to more time sitting, less varied movement, and reduced overall activity. That’s actually good news, because disuse can be reversed with the right stimulus. You’re not fighting an inevitable decline. You’re retraining muscles that have just been quiet for a while.
If you’re also dealing with balance challenges beyond hip weakness, the exercises in our guide on vertigo and balance exercises for seniors pair well with this routine as a complementary approach.
Before You Begin: A Few Practical Notes
These exercises are designed to be gentle and accessible. Most can be done on a yoga mat on the floor or modified to be performed standing or in a chair. That said, if you’ve recently had hip surgery, check with your surgeon or physical therapist first. Some movements have post-operative restrictions depending on the approach used.
For those recovering from a procedure, our post-hip replacement exercise guide covers what’s safe and when, and can help you understand how these glute exercises fit into a longer recovery timeline.
A few things to have on hand before you start:
- A firm exercise mat or a folded blanket for floor work
- A sturdy chair for standing exercises
- Optional: a mini resistance loop band to add gentle challenge as you progress
Start without the band. Get comfortable with the movement pattern first, then add resistance once your form is solid.
Exercise 1: Glute Bridges
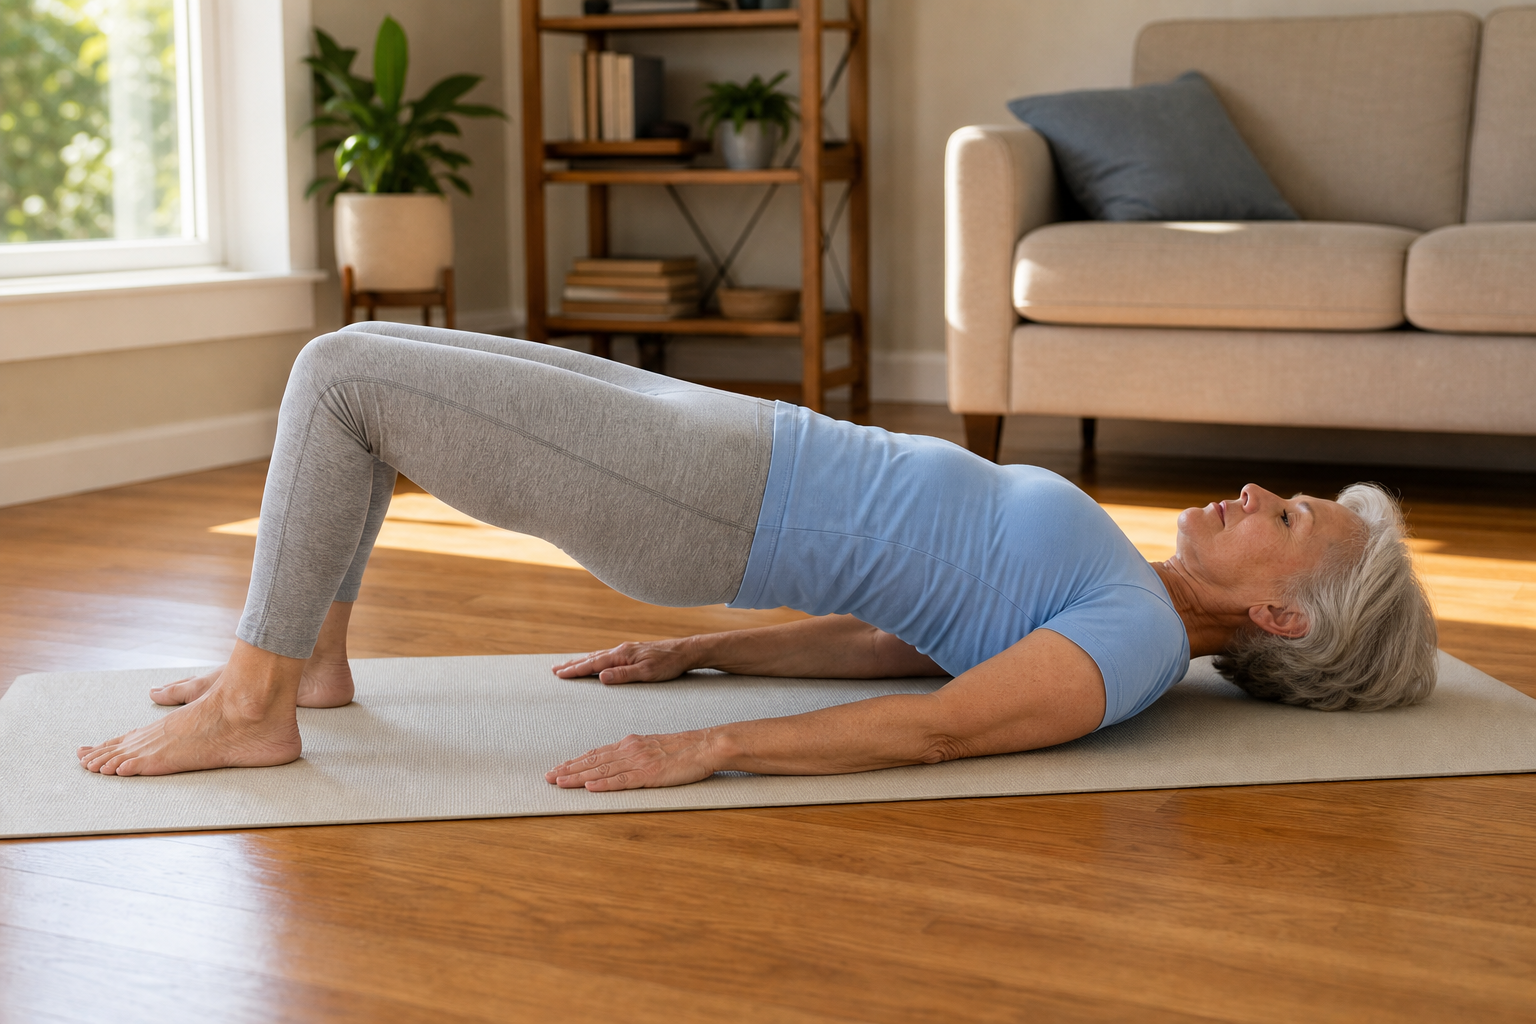
The glute bridge is probably the most effective floor exercise for reactivating the gluteus maximus. It’s low-impact, easy on the knees, and most people feel it working right away once they get the form right.
How to Do It
- Lie on your back with your knees bent and your feet flat on the floor, roughly hip-width apart. Your heels should be about 12 inches from your hips.
- Press your feet into the floor and squeeze your glutes as you lift your hips toward the ceiling. Think about driving your hips up, not arching your lower back.
- At the top, your body should form a straight line from your shoulders to your knees. Pause here for 2 seconds and really squeeze.
- Lower slowly, taking about 3 seconds to come back down. That slow descent is where a lot of the muscle work happens.
- Aim for 10 to 15 repetitions, rest 60 seconds, and repeat for 2 to 3 sets.
Common Form Mistakes to Avoid
Many people push through their feet and use their hamstrings more than their glutes, especially if the feet are placed too far from the hips. If you feel this mostly in the back of your thighs, move your feet a couple of inches closer to your body.
Also resist the urge to flare your knees outward. Keep them in line with your second toe throughout the movement. A mini loop band placed just above the knees can actually help with this by giving you something to gently push against.

Mini Resistance Loop Bands
A set of loop bands in multiple resistance levels lets you progress gradually, making them ideal for glute bridges and clamshells as you build strength.
Exercise 2: Clamshells
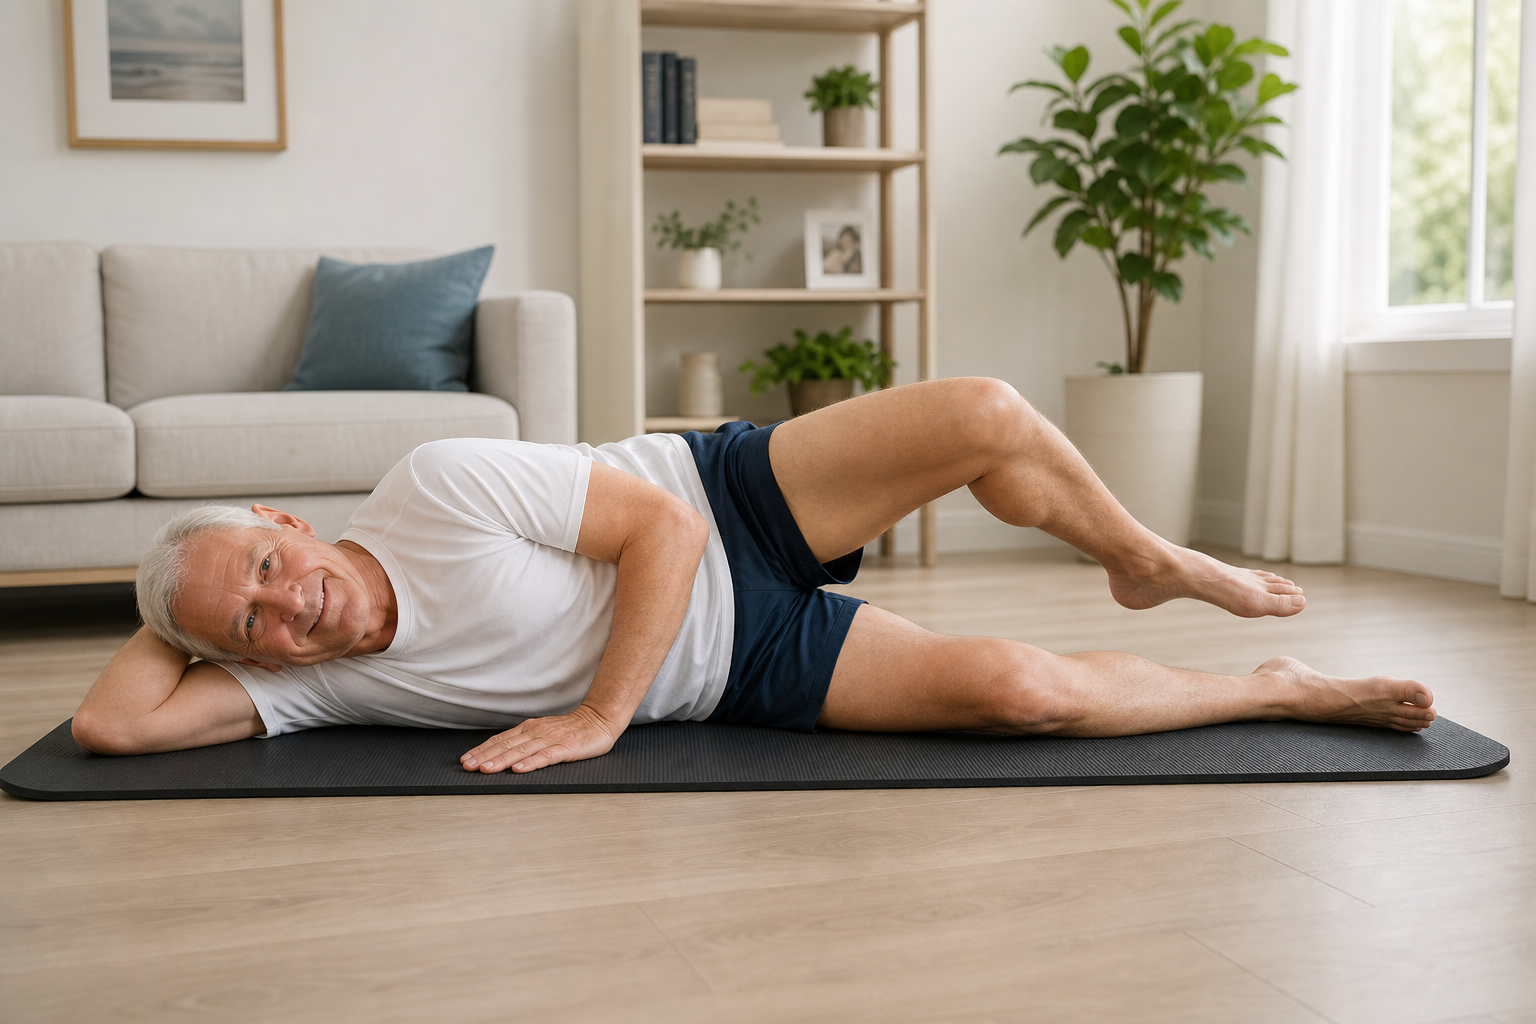
The clamshell targets the gluteus medius, which is the muscle on the outer hip that stabilizes your pelvis when you walk. It’s often neglected because it doesn’t get much attention from common exercises like squats or leg presses.
How to Do It
- Lie on your side with your hips and knees bent to about 45 degrees, stacking your legs on top of each other. Rest your head on your lower arm.
- Keeping your feet together, slowly raise your top knee toward the ceiling, rotating from the hip. Think of a clamshell opening.
- Open as far as you can without rolling your top hip backward. The movement should be controlled and deliberate, not a quick kick.
- Hold briefly at the top, then lower slowly back down.
- Do 12 to 15 reps on one side, then switch. Work up to 2 to 3 sets per side.
Tips for Getting the Most From Clamshells
The most common mistake is letting the pelvis rotate backward as the knee rises. When that happens, you’re no longer isolating the gluteus medius. Place your top hand on your hip to feel for any unwanted rotation and keep it still.
Once bodyweight clamshells feel easy, place a mini loop band just above the knees. Even a light band creates noticeable extra challenge and keeps the exercise productive as you get stronger.
Exercise 3: Standing Hip Extensions
Standing hip extensions are ideal for anyone who prefers to stay upright, and they directly train the movement pattern your glutes use when you walk or climb stairs. This exercise also challenges your balance in a functional way because you’re standing on one leg.
How to Do It
- Stand behind a sturdy chair and hold the back lightly for balance. Don’t grip it tightly; the goal is to use your own stability as much as possible.
- Shift your weight onto your left foot and keep a slight bend in that knee.
- Keeping your right leg straight and your core gently engaged, slowly push your right foot back and slightly upward, squeezing your right glute at the top of the movement.
- Your torso should stay mostly upright. Don’t hinge forward from the waist to get more range. Less movement with good form beats more movement with poor form every time.
- Lower the foot back down slowly. Do 10 to 12 reps on each side for 2 to 3 sets.
This exercise ties directly into walking mechanics, where your trailing leg pushes off by extending the hip. Strengthening this pattern can noticeably improve your walking endurance and efficiency over several weeks of consistent practice.
For those working on a broader strength program, our guide on progressive resistance training shows how to build on exercises like this one in a structured 12-week format.
Adding Resistance Bands to Progress Over Time
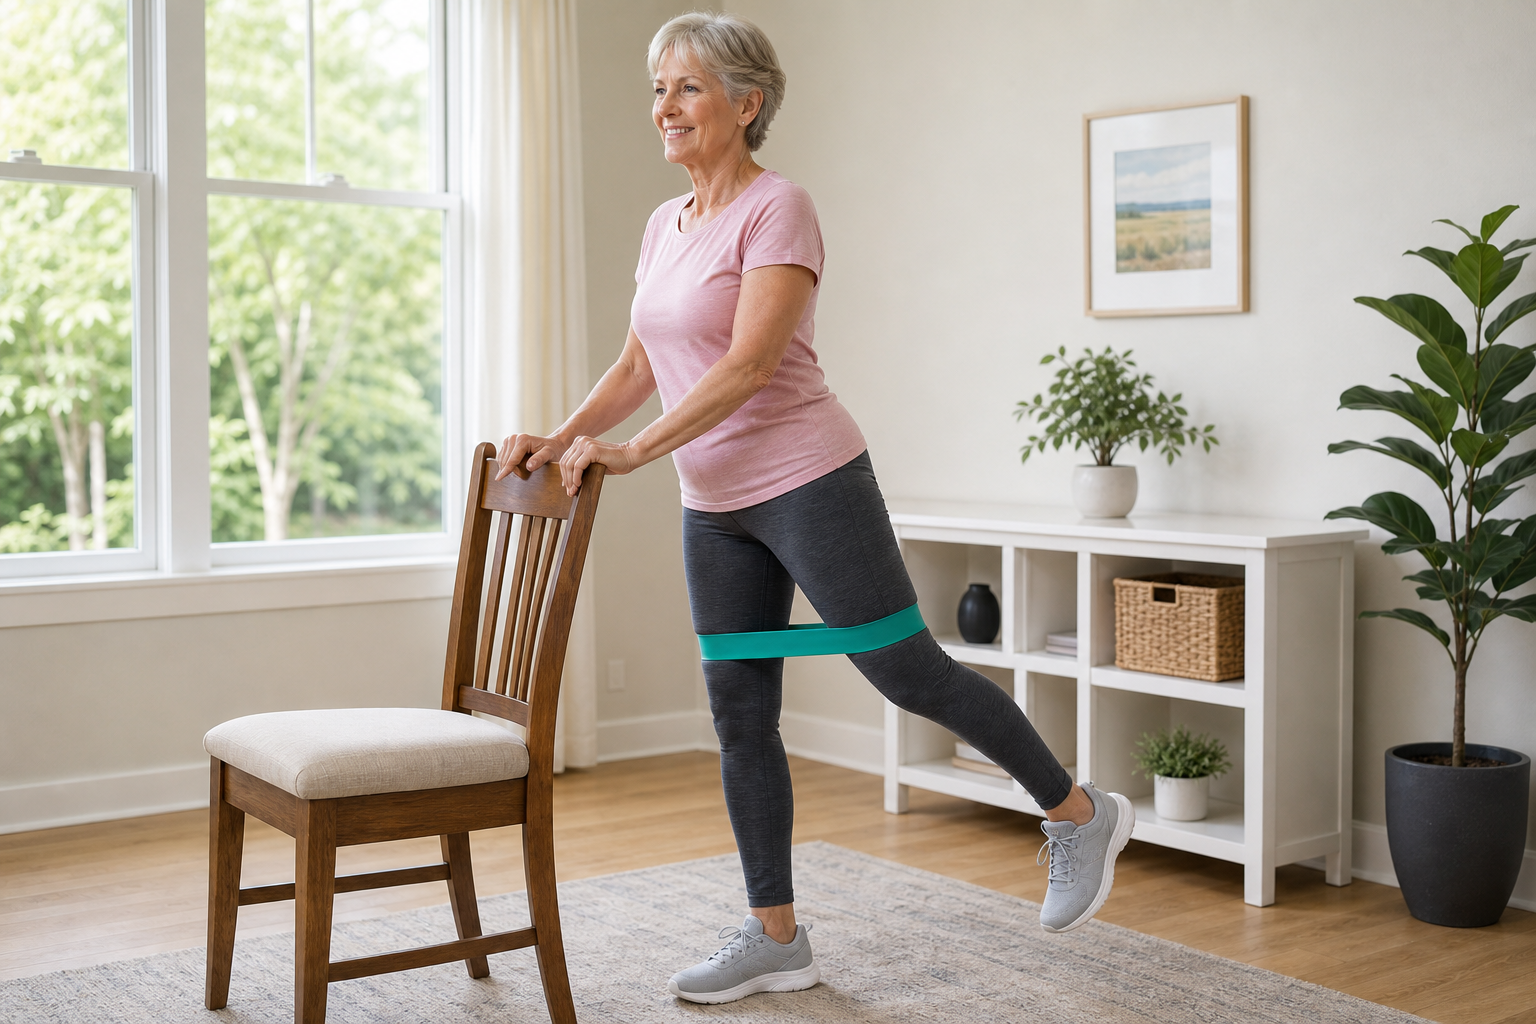
Once all three exercises start to feel manageable, it’s a sign your glutes are getting stronger. That’s the right time to introduce a light resistance band. Loop bands that sit just above the knees work well for bridges and clamshells, while ankle loop bands or cable-style resistance bands can add challenge to standing hip extensions.
Look for bands with clearly labeled resistance levels. Light, medium, and heavy bands let you progress incrementally without jumping too far ahead. A good set is also budget-friendly and takes up almost no storage space, which makes them a solid addition to any home setup.

Fabric Resistance Bands for Seniors
Fabric bands stay in place better than latex options and are gentler on skin, making them a practical choice for seniors doing regular hip and glute work.
If you’re building out a home workout space more broadly, our article on budget-friendly home gym setups for seniors has practical suggestions for what’s actually worth buying versus what you can skip.
How Often to Do These Exercises
For most seniors, doing this routine 3 to 4 times per week hits the sweet spot between enough stimulus to build strength and enough recovery time to avoid soreness interfering with daily life. Glute muscles aren’t as heavy-use as your quads or calves, so they recover relatively quickly.
One full session might look like this: 2 sets of bridges, 2 sets of clamshells on each side, and 2 sets of standing hip extensions on each side. That’s roughly 15 to 20 minutes of actual exercise time. Short, focused, and effective.
Supporting your body with good nutrition around training matters too. A small protein-rich snack after exercise helps with muscle repair, especially for those over 70. Our guide on post-workout recovery meals for seniors covers what to eat and when to maximize the benefit of every session.
Adequate vitamin D for bone and muscle health is also something to keep in mind, since low vitamin D is common in older adults and is associated with reduced muscle function.
Comfortable Gear That Makes a Difference
You don’t need much equipment for these exercises, but a good mat makes floor work noticeably more comfortable, especially if you have bony hips or knees that press against a hard surface.

Thick Exercise Mat for Seniors
A thicker mat (3/4 inch or more) provides cushioning for floor-based glute work and reduces discomfort on hard surfaces.
Look for a mat that’s at least 3/4 inch thick and has a non-slip surface. Some mats marketed for yoga are too thin to offer real cushioning during exercises like bridges and clamshells where you’re putting weight on your tailbone and hips.
Frequently Asked Questions
How long does it take to notice improvements in balance and stability?
Most people start noticing small changes within 3 to 4 weeks of consistent training, such as feeling more stable on stairs or more confident walking on uneven ground. More significant strength gains typically show up around the 6 to 8 week mark. Consistency matters more than intensity here, so stick with 3 to 4 sessions per week and be patient with the process.
Are these exercises safe if I have arthritis in my hips or knees?
Generally yes, because none of these exercises require bearing weight through a flexed or compressed joint. Glute bridges and clamshells are particularly arthritis-friendly since they work the hip in a supported position. If you notice sharp joint pain (not just muscle fatigue), stop and consult your doctor or physical therapist. Our article on arthritis-friendly exercises for seniors has additional guidance on modifying movement for joint pain.
Can I do these exercises if I have lower back pain?
Weak glutes are actually one of the contributing factors to lower back strain, so strengthening them often helps rather than hurts. That said, focus on form: during bridges, avoid over-arching your lower back at the top of the movement. During standing hip extensions, keep your torso upright rather than leaning forward. If back pain flares during any of these, reduce your range of motion or skip the floor exercises until you’ve had a chance to speak with a healthcare provider.
Do I need to warm up before doing glute exercises?
A brief warm-up does help, especially in the morning when joints and muscles are stiffer. A 5-minute walk around the house, some gentle leg swings, or a few minutes of slow marching in place is enough to get blood flowing before you start. You don’t need an elaborate pre-workout routine for gentle exercises like these, but jumping cold from your couch straight into bridges isn’t ideal.
Putting It All Together
Stronger glutes won’t happen overnight, but they will happen with consistent effort. Three exercises, a few times a week, with attention to form, can meaningfully change how stable and confident you feel on your feet. Bridges build hip extension power. Clamshells train lateral hip stability. Standing hip extensions connect it all to real-world walking mechanics.
Start at bodyweight, build your form, then gradually add band resistance as the exercises become easier. Keep your sessions short and focused. Pair your training with solid nutrition and recovery habits. Over several weeks, you’ll likely notice the difference not just in the exercises themselves, but in how you move through your day.
This article contains affiliate links. We may earn a small commission at no extra cost to you.
