A balance cushion (also called a wobble cushion or stability disc) is an inflatable disc about 13 to 14 inches in diameter that creates an unstable surface under your feet or your seat. Standing on one challenges your ankle stabilizers, hip muscles, and core to work constantly to keep you upright. Sitting on one while doing chair exercises turns ordinary seated movements into core-intensive work.
For seniors, balance cushions offer a safer, more accessible balance challenge than balance boards because the instability is moderate rather than extreme.
How Balance Cushions Work
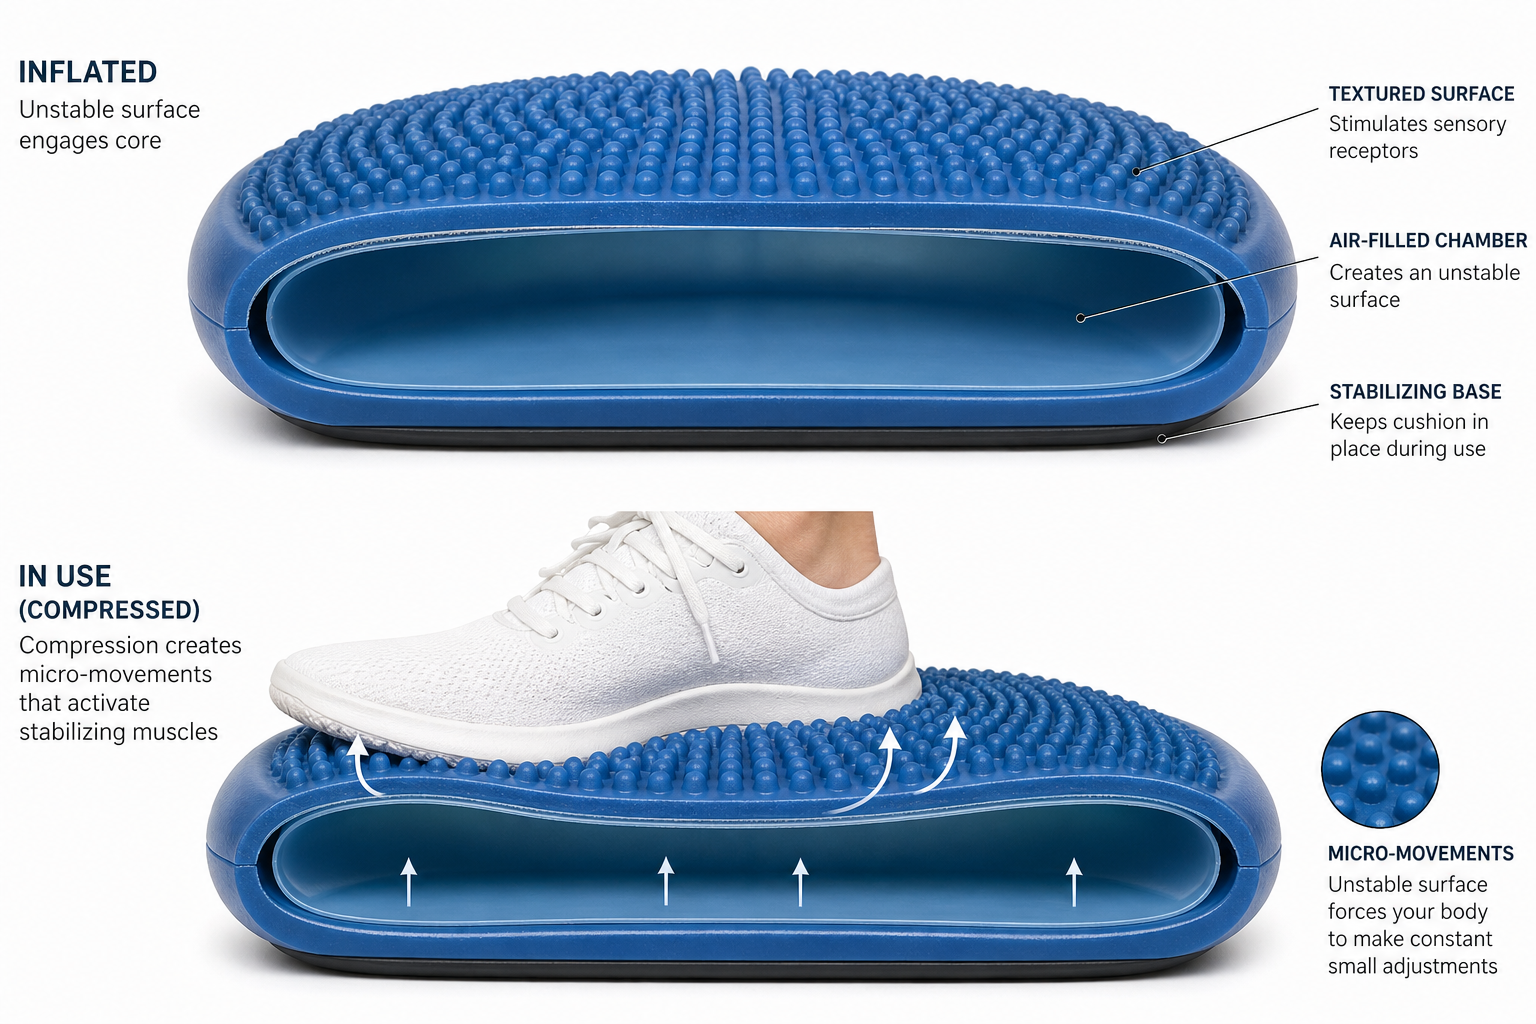
The air-filled disc compresses and shifts under your weight, creating small, constant perturbations (disturbances) that your body must react to. These reactions train the proprioceptive sensors in your ankles, knees, and hips, the reflexive muscle contractions that maintain balance, and the deep core muscles that stabilize your trunk over your base of support.
The instability is significant enough to produce training adaptations but mild enough that a loss of balance results in stepping off the cushion rather than falling.
Unlike foam pads or rolled towels, which compress but don’t shift, the air inside a balance cushion moves dynamically. When you shift your weight left, the air pushes to the right, creating a corrective challenge. Your nervous system learns to anticipate and respond to these shifts more quickly over time.
This training carries over directly to real-world balance situations: recovering from a stumble on uneven pavement, catching yourself on a slippery floor, or adjusting your stance when reaching for something on a high shelf.
The textured surface on most cushions adds another layer of sensory feedback. The nubs or ridges stimulate pressure receptors in your feet, sending more information to your brain about where your weight is distributed. This heightened awareness improves the precision of your balance adjustments.
Top Balance Cushions for Seniors
STOTT PILATES Stability Cushion
The STOTT PILATES cushion is a premium disc with a textured surface on one side (for tactile grip) and a smooth surface on the other. The inflation level is adjustable via a hand pump: more air creates more instability, less air creates a flatter, more stable surface.
The 14-inch diameter fits standard chair seats. The PVC construction is durable and easy to clean.

STOTT PILATES Stability Cushion
Premium dual-surface design with adjustable firmness and included pump
The dual-surface design lets you flip the cushion based on the exercise. The textured side works well underfoot for standing exercises because the nubs prevent slipping. The smooth side works better under your seat for chair exercises because it doesn’t create pressure points through clothing.
The included pump has a needle adapter that fits the valve securely without air leaks. At roughly 2 pounds, it’s easy to move between your living room and bedroom.
Gaiam Balance Disc
The Gaiam balance disc is a widely available, affordable option with nubbed texture on both sides for foot grip. The 13-inch diameter works for both standing and seated use. Inflation is adjustable with the included pump. It’s lightweight enough to carry between rooms and durable enough for daily use.
The consistent texture on both sides eliminates the decision of which side to use. The nubs are shorter and softer than those on some cushions, which makes sitting on it more comfortable during longer seated exercise sessions.
The valve system holds air reliably over weeks of use. The disc comes in multiple colors if you care about matching your exercise space. Weight capacity is typically listed at 300 pounds, sufficient for most users.
URBNFit Balance Disc
The URBNFit disc features a ridged surface on one side and a smooth surface on the other. The ridged side provides tactile feedback underfoot that enhances proprioceptive input. It includes a pump and a quick-start exercise guide.

URBNFit Balance Disc
Budget-friendly option with distinctive ridged surface and included exercise guide
The ridges run in concentric circles rather than random nubs, creating a distinct pressure pattern under your feet. Some users find this pattern more noticeable than standard nubs, which can be helpful if you have reduced foot sensation.
The smooth side is completely flat, not just smooth-textured, making it genuinely comfortable for seated work. The included exercise guide shows basic standing and seated positions with simple illustrations.
Seated Core Exercises on a Balance Cushion
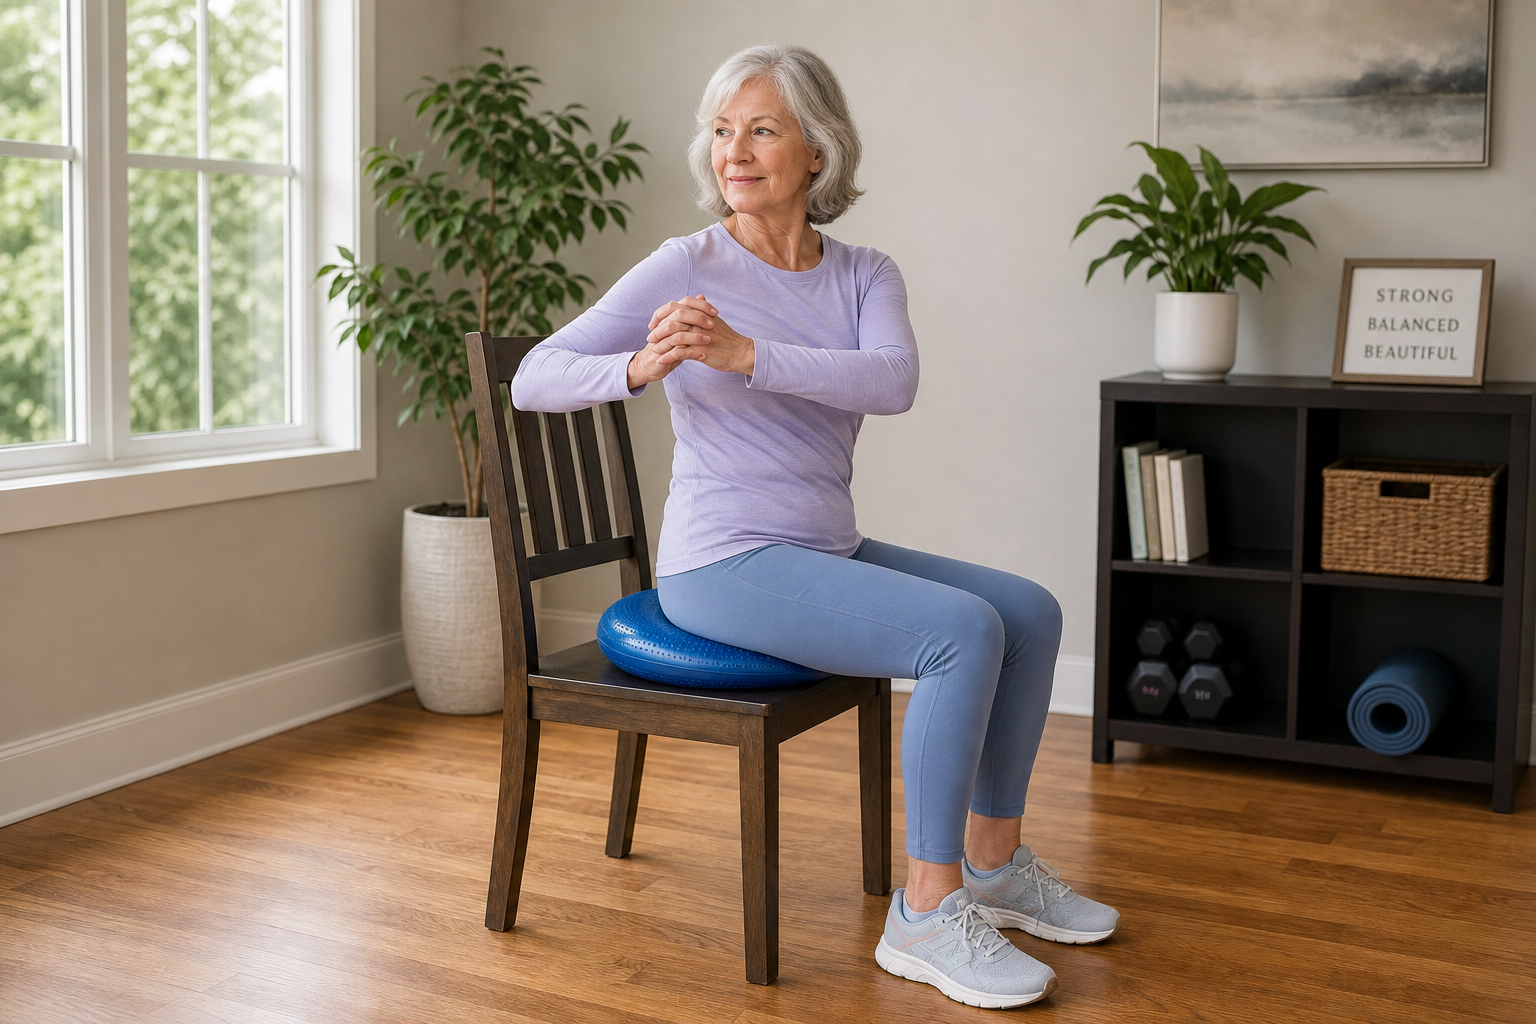
Place the cushion on your chair seat. The unstable surface forces your core to engage constantly while you perform seated exercises, transforming ordinary chair work into core-intensive training.
Seated exercises are where you should start regardless of your current fitness level. They let you get familiar with the cushion’s instability while your base of support is wide and stable. The chair back is there if you need it, but the goal is to sit upright without leaning back.
- Seated marches: Sit on the cushion, lift one knee at a time. The cushion shifts with each lift, challenging your obliques and deep stabilizers. 2 sets of 20.
- Seated trunk rotations: Arms crossed, rotate left and right. The cushion amplifies the rotational challenge. 2 sets of 10 per side.
- Seated lean-backs: Sit at the edge of the chair (cushion under you), cross arms, lean back 20 degrees. The instability makes your abs work twice as hard to control the lean. 3 sets of 8.
- Seated arm raises: Lift both arms overhead, to the sides, and forward while maintaining balance on the cushion. The shifting weight of your arms creates balance perturbations your core must manage. 2 sets of 10 in each direction.
Start each exercise with the cushion partially deflated so the instability is mild. As the movements become easier, inflate the cushion another 10 to 20% to restore the challenge.
If an exercise feels too hard, reduce the range of motion first (smaller marches, shorter lean-backs, lower arm raises) before deflating the cushion. Small, controlled movements done correctly build strength faster than large, wobbly movements done poorly.
Add a pause at the challenging point of each movement. During seated marches, hold your knee up for 2 seconds before lowering. During rotations, pause at the end range before returning to center. These pauses force your core to stabilize the position actively rather than using momentum to carry you through.
Standing Exercises on a Balance Cushion
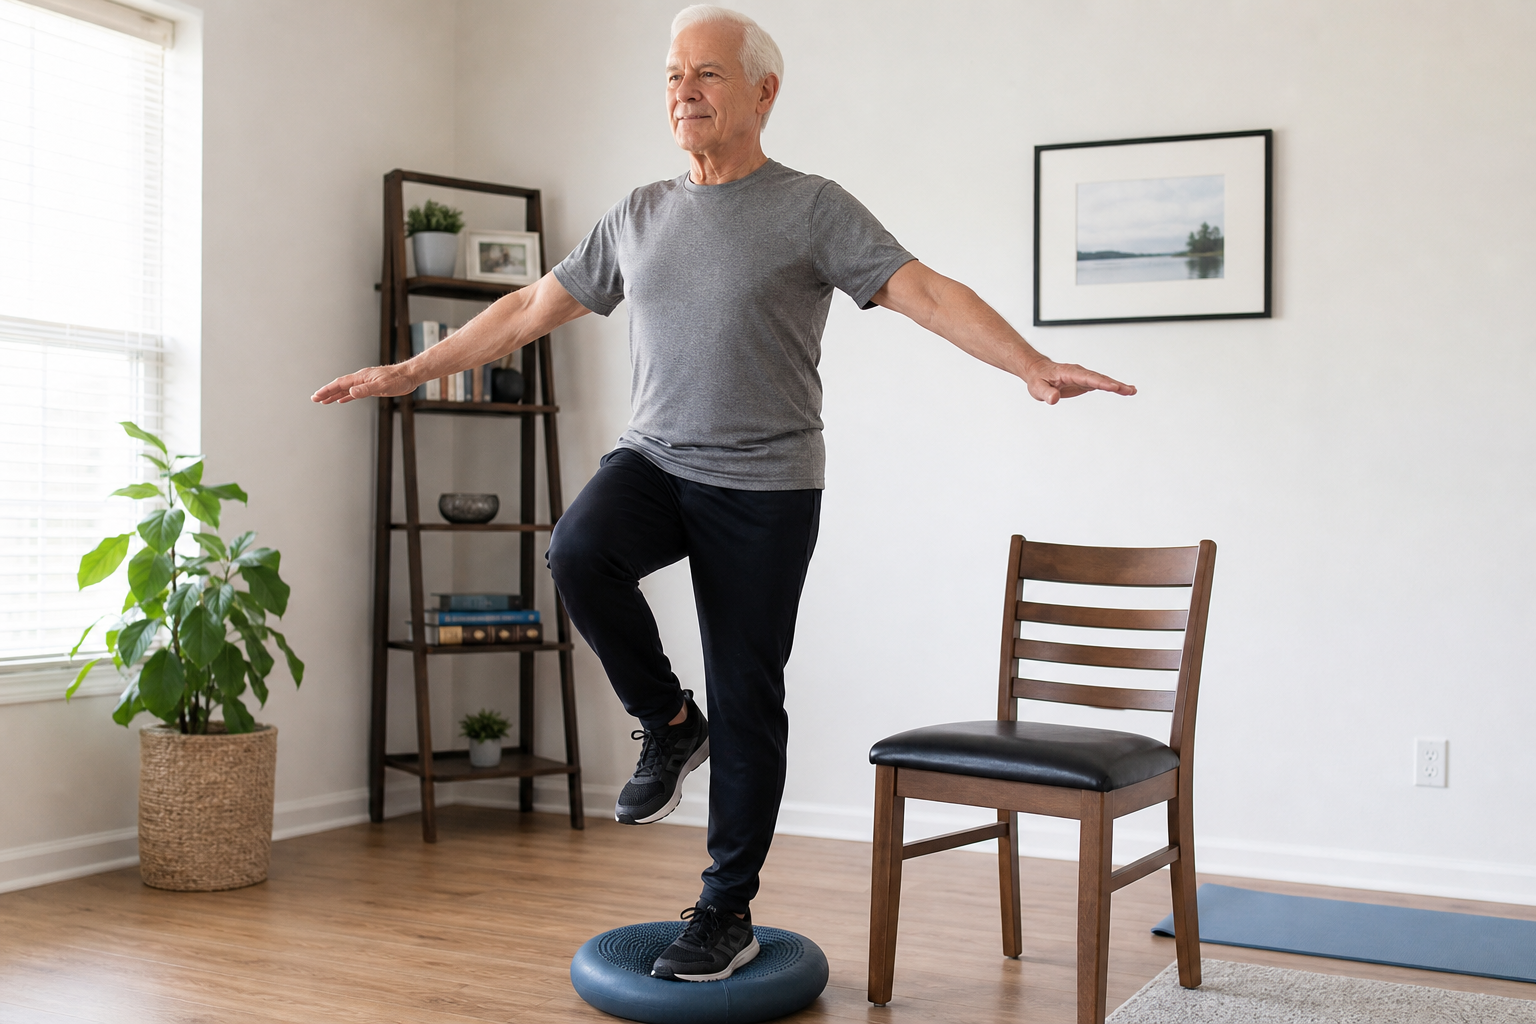
Place the cushion on the floor near a counter. Stand on it with both feet for the following exercises:
- Two-foot stance: Simply stand on the cushion. Hold for 30 to 60 seconds. This alone challenges your ankle and core stability. Progress by reducing hand contact with the counter.
- Single-leg stance: Stand on one foot on the cushion, other foot lifted slightly. Fingertips on counter. Hold 15 to 30 seconds per leg. This is significantly harder than single-leg standing on a flat floor.
- Mini squats: Stand on the cushion. Perform shallow squats (30-degree knee bend). 2 sets of 10. The unstable surface forces your stabilizers to work throughout the squat.
- Weight shifts: Stand on the cushion. Slowly shift your weight to the right, then left. 10 per side. This trains the lateral weight transfer you use during every step of walking.
Position the cushion six inches from the counter so you have immediate access to support without needing to reach. Bare feet or non-slip socks work better than shoes because you get better sensory feedback from the textured surface. Thick-soled athletic shoes dull the proprioceptive input you’re trying to enhance.
Two-foot stance should feel challenging but not scary. If you’re white-knuckling the counter, the cushion is too inflated. Let some air out until you can stand with light fingertip contact only. Your first goal is 30 seconds with light touch, then 30 seconds with no touch, then 60 seconds with no touch.
For weight shifts, think about how you shift your weight when you walk. You don’t jerk from foot to foot. Move smoothly from one side to the other, pausing briefly when your weight is centered and when it’s fully shifted. This slow, controlled shift is harder than a quick bounce and builds better balance control.
Mini squats are not about depth. A 30-degree knee bend (roughly a quarter of the way to a full squat) is enough to challenge your balance on the cushion. Keep your weight centered over the middle of the cushion.
If you feel yourself tipping forward onto your toes, stand up and reset. The cushion will try to roll forward as you descend. Resisting that roll is where the core work happens.
Advanced Variations
Once you can complete all the basic standing exercises with minimal counter support, these progressions add new challenges:
Single-leg reaches: Stand on one leg on the cushion. Reach the other leg forward, tap the floor with your toe, return to standing. 5 reaches per leg. Then reach to the side, then behind you. This trains dynamic balance, not just static holding.
Cushion-to-floor transitions: Stand next to the cushion. Step onto it with one foot, bring the other foot up, then step off the other side. This simulates stepping up onto a curb or into a vehicle, common real-world balance challenges. If you’ve recently had hip replacement surgery or knee replacement surgery, check with your physical therapist before attempting this variation.
Eyes-closed stance: Stand on the cushion with both feet. Close your eyes. Hold for 10 to 20 seconds. Removing visual input forces your proprioceptive system to work harder. Only attempt this when you’re confident in the two-foot stance with eyes open.
Tandem stance on cushion: Stand with one foot directly in front of the other (heel to toe) on the cushion. This dramatically narrows your base of support. Start with 10 seconds per side, counter support allowed.
Catch and toss: Stand on the cushion. Have a partner toss you a light ball (or toss it against a wall and catch the rebound). The arm movement and visual tracking create balance perturbations you must manage while maintaining your stance.
These variations should feel significantly harder than the basic exercises. If they don’t, your basic exercises are ready for more inflation or longer hold times.
Combining Balance Cushions with Strength Training
Balance cushions amplify the core demands of resistance exercises. These combinations build strength and balance simultaneously, similar to the approach used in progressive resistance training programs:
Seated rows on cushion: Sit on the cushion. Anchor a resistance band to a doorknob at chest height. Perform rows. The pulling motion shifts your weight backward. Your core must resist that shift. 3 sets of 12.
Standing overhead press on cushion: Stand on the cushion near the counter. Hold light dumbbells (3 to 5 pounds). Press overhead. The arm movement raises your center of gravity and shifts your weight subtly. Your ankles and core compensate. 2 sets of 10.
Seated chest press on cushion: Sit on the cushion. Anchor a band behind you at shoulder height. Press forward. The forward push tries to shift your weight forward off the cushion. Your core resists. 3 sets of 12.
Bicep curls on cushion: Stand on the cushion. Hold light dumbbells. Perform curls. Even this simple movement becomes a balance challenge when your base is unstable. 2 sets of 15.
Use lighter weights than you would on stable ground. The balance demand limits how much load you can control safely. A 5-pound dumbbell on a cushion may challenge you as much as a 10-pound dumbbell on the floor.
Progression Strategy
- Week 1 to 2: Seated exercises only. Get comfortable with the cushion’s instability under your seat before standing on it.
- Week 3 to 4: Add two-foot standing on the cushion near a counter. Full hand support initially.
- Week 5 to 6: Reduce hand support to fingertips. Add weight shifts and mini squats.
- Week 7 to 8: Add single-leg standing. Increase inflation for greater instability.
- Week 9+: Combine cushion exercises with resistance exercises (banded rows while standing on the cushion, dumbbell presses while seated on the cushion).
This timeline assumes you’re training three times per week. If you train more often, you may progress faster. If less often, allow more time at each stage. The timeline isn’t a race. Rushing to standing exercises before you’re ready increases fall risk without improving results.
Expect setbacks. A stiff day, a poor night’s sleep, or a change in medication can temporarily reduce your balance. When that happens, step back to an earlier progression rather than pushing through. Deflate the cushion, use more counter support, or return to seated exercises.
Consistency over weeks matters more than any single session.
Common Mistakes and How to Avoid Them
Overinflating too soon: A rock-hard cushion is not better. It’s just harder, often too hard to use safely. Most people should train at 75 to 85% inflation indefinitely. Only inflate further when exercises become genuinely easy at current inflation.
Skipping the counter setup: Standing on a cushion in the middle of a room with nothing to grab is not brave. It’s risky. Always position the cushion near a stable surface. You can choose not to use the counter, but it should be there.
Holding your breath: Balance work triggers a stress response. Many people unconsciously hold their breath during challenging positions. This raises blood pressure and reduces oxygen to working muscles. Breathe normally throughout every exercise.
Looking down at your feet: Your eyes help your balance system, but staring at the cushion creates neck strain and doesn’t train your balance as effectively. Look forward at eye level. Your feet will figure it out without supervision.
Training through sharp pain: Muscle fatigue and shaking are normal during balance training
