Falls happen. One in three adults over 65 falls each year, and knowing how to fall safely can mean the difference between a bruise and a broken hip. The instinctive response to a fall, reaching out with stiff, straight arms, is actually the most dangerous reaction because it concentrates all the impact force through your wrists, elbows, and shoulders.
Learning to fall in a way that distributes the impact across larger, more padded body areas dramatically reduces fracture risk. And knowing how to get up afterward means a fall doesn’t leave you stranded on the floor.
This isn’t about becoming fearful of movement. It’s about building practical skills that let you stay active with more confidence. The techniques below come from physical therapy, martial arts adapted for older adults, and fall prevention research. They work whether you’re steady on your feet now or already dealing with balance challenges.
How to Fall Safely
Protect Your Head
The single most important priority during any fall is protecting your head. Tuck your chin to your chest immediately. This reflex keeps the back of your head from slamming into the ground.
If you’re falling backward, tucking the chin is critical because a backward head strike carries the highest risk of concussion and brain bleeding, especially for seniors on blood thinners.
Your skull is hard, but the brain inside bruises easily. Backward falls that result in the head bouncing off tile, concrete, or hardwood can cause subdural hematomas, which are particularly dangerous for anyone taking anticoagulants like warfarin or aspirin. The chin tuck creates a buffer of neck muscle and shifts the impact point away from the most vulnerable part of the skull.
Practice the chin tuck while sitting. Drop your chin like you’re trying to make a double chin, pulling it straight back toward your throat. Hold for three seconds. This simple movement, repeated until it feels automatic, can become a protective reflex.
Don’t Reach Out with Straight Arms
The instinct to catch yourself with outstretched hands directs all of the impact force through your wrists (Colles fracture), elbows, or shoulders. Instead, bend your elbows and try to absorb the impact with the fleshy parts of your body: your buttocks, your thighs, or the sides of your body.
Wrist fractures from falls typically happen when the hand hits the ground with the arm locked straight. The radius bone near the wrist can’t handle the sudden load and snaps. Recovery from a Colles fracture often takes eight to twelve weeks and can leave lasting stiffness in the wrist joint.
If your arms are going to contact the ground, bent elbows allow the impact to spread through more joints and muscles. Think of your arms as shock absorbers, not rigid posts. The goal is to let the impact roll through your body rather than stopping at a single point.
Round Your Body
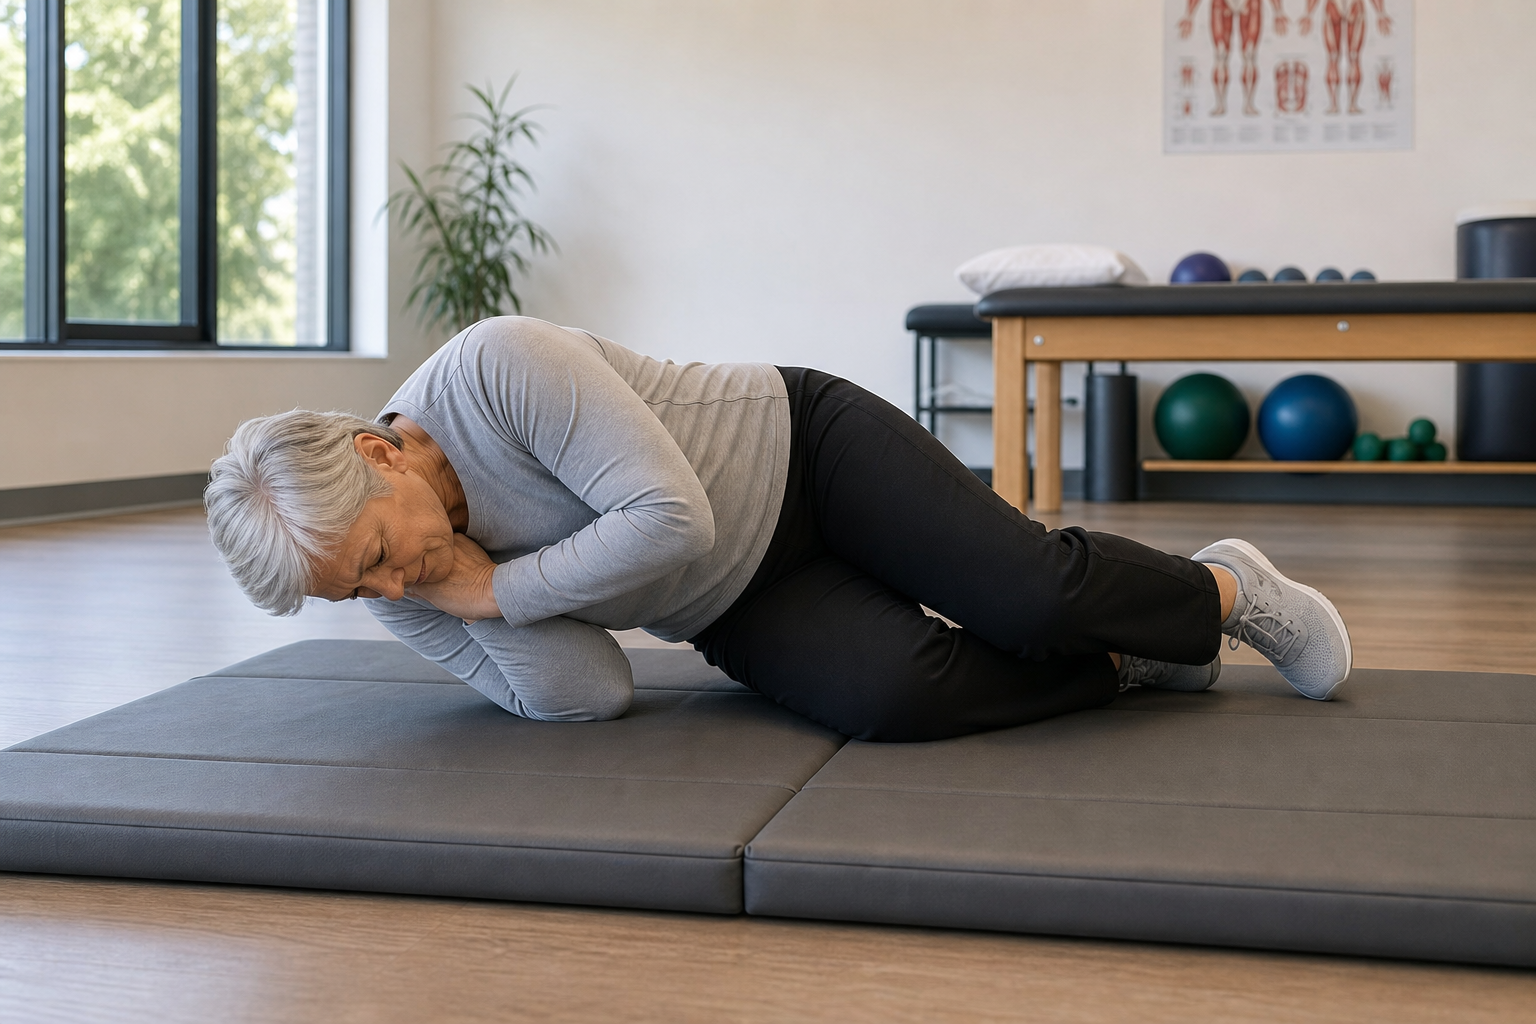
If you feel yourself going down, try to curl into a rounded shape (like a ball). Tuck your chin, bend your knees, round your back, and pull your arms in. A rounded body distributes impact across a larger surface area and rolls with the force rather than stopping it abruptly.
Martial artists call this “breakfalling,” and it reduces injury from falls at any speed.
A flat, rigid landing concentrates force. A rounded landing disperses it. Picture the difference between dropping a board flat versus dropping a ball. The board hits all at once. The ball rolls and spreads the impact over time and space.
When you round your body, you create multiple contact points (shoulder blade, side of hip, outer thigh) instead of one sharp impact point. The soft tissues, your buttocks and thigh muscles, act as natural padding. Bone close to the surface, like the kneecap or elbow point, does not.
Fall to the Side If Possible
Falling forward risks wrist fractures (from catching yourself) and facial injuries. Falling backward risks head injury and spinal compression. Falling to the side, landing on the large muscles of the buttock and thigh, distributes force across the largest, most padded area of your body.
If you have a split-second to choose your direction, aim sideways.
The hip has more padding than most people realize. The gluteus maximus is the largest muscle in the body. The outer thigh has a thick layer of muscle and fat. These areas can absorb impact far better than the tailbone (coccyx), the front of the knee, or the extended wrist.
If you’re falling forward and can’t stop it, try to twist slightly so you land on your side and the front of your shoulder, not straight onto your hands and face. If you’re falling backward, the same principle applies: twist to bring one side down first.
Relax (If You Can)
A tense body absorbs impact like a rigid stick. A relaxed body absorbs impact like a cushion. While relaxing during a fall is nearly impossible without practice, the concept is important: the more you can avoid rigid bracing, the better your body distributes the impact forces.
Tensing up locks your joints and turns your skeleton into a brittle frame. Relaxing, even slightly, allows your muscles to absorb some of the shock. Judo and aikido students spend months learning to fall while staying loose. You don’t need months, but understanding the principle helps.
Breathing out during a fall can help reduce tension. It’s counterintuitive, but a quick exhale as you go down can keep your torso from clenching. This is an advanced technique and not the first thing to focus on, but it’s worth knowing if you practice falling regularly.
Practicing Safe Falling
Safe falling is a skill that improves with practice. You can practice at home with safety precautions:
- Use a thick exercise mat or pile of blankets on the floor to cushion practice falls.
- Start from kneeling. From a kneeling position, practice falling to the side: tuck your chin, round your body, and lower yourself onto the mat. This teaches the movement pattern from a low height with minimal impact.
- Progress to standing. From standing, practice lowering yourself to the floor in a controlled “fall”: bend your knees, lower to one knee, then roll to your side on the mat. This isn’t a true fall speed, but it rehearses the protective positions and movements.
- Have someone present for the first few practice sessions in case you need assistance.

Exercise Mat for Fall Practice
Look for mats at least one inch thick to provide adequate cushioning during practice falls
Tai chi and martial arts classes for seniors specifically include fall practice (ukemi or breakfalling) in their curriculum. If available in your area, these classes provide guided fall training in a safe environment. For more on the benefits of tai chi, check out Yoga vs Tai Chi for Seniors: Which Practice Is Better for You? Many people find that tai chi training improves both balance and body awareness, making protective movements more instinctive.
Start with just the positions. Lie on a mat and practice tucking your chin. Practice rounding your back while on your side. Get comfortable with the shapes your body needs to make. Then add slow, controlled movement from kneeling to side-lying. Speed is not the goal. Correct form is.
Practicing on carpet or a yoga mat is fine for learning the positions, but a dedicated exercise mat (at least one inch thick) gives better cushioning. Folding gym mats or crash pads used for home gymnastics work well. You can find these in the 24 to 48 inch width range, which is enough space for side falls from kneeling.
If kneeling is hard on your knees, start from sitting. Sit on the mat and practice rolling to your side with your chin tucked and body rounded. The movement pattern is the same, just from an even lower starting point.
How to Get Up After a Fall: The 5-Step Sequence
Step 1: Stay Calm and Assess
Don’t try to jump up. Lie still for a moment. Wiggle your fingers and toes. Gently move each limb. Check for sharp pain that might indicate a fracture.
If anything feels broken or you can’t move a body part, stay down and call for help (use your phone or a medical alert device).
Take at least thirty seconds for this assessment. Adrenaline can mask pain initially. Sharp, localized pain that worsens with movement is a red flag. Numbness, tingling, or inability to bear weight on a limb are also signs to stop and get help.
If you hit your head, even if you tucked your chin, be extra cautious. Dizziness, confusion, nausea, or a severe headache means you need medical attention. Don’t get up on your own. Call 911 or have someone assist you.
Check your surroundings. Is there blood? Did you knock over furniture? Is the thing that caused the fall (a rug, a spill, a pet) still a hazard? Clear the area mentally before you move.
Step 2: Roll to Your Side
From your back, bend your knees and roll onto your stronger side using your arm to guide the roll.
Bend both knees so your feet are flat on the floor. Reach across your body with your top arm and use it to pull yourself onto your side. Your knees rolling together will help the momentum. If you have a weaker side from a stroke or injury, roll toward your stronger side so that side does the work of getting up.
Once on your side, take another breath. Make sure you’re not dizzy. This position is stable, and you can rest here as long as you need before moving to the next step.
Step 3: Push to Hands and Knees
From your side, use your top arm to push your upper body up while swinging your knees under you. You’re now on all fours.
Place your top hand flat on the floor near your chest. Press down through that hand while you draw your knees up underneath your hips. Your bottom arm can help brace or push off the floor as well. The motion is like doing a push-up from the side position into a tabletop position.
If your wrists hurt in this position, you can modify by resting on your forearms instead of your hands. Forearm plank position works just as well for the next step.
All fours is a stable, safe position. Catch your breath here. Check again for dizziness or pain before moving forward.
Step 4: Crawl to Furniture
On hands and knees, crawl to the nearest sturdy furniture: a couch, heavy chair, bed frame, or low table. Place both hands on the surface.
Crawling is stable and low to the ground. If you feel weak or dizzy, crawling prevents another fall. Move slowly. Pick furniture that won’t slide or tip. A dining chair can work if it’s heavy, but a couch or bed is better. Kitchen counters and heavy coffee tables are good options.
Avoid furniture with wheels, lightweight folding chairs, or anything that could shift under your weight. If the nearest furniture is unstable, crawl past it to something more solid.
Place both hands flat on the seat of the chair or the edge of the bed. Your hands should be shoulder-width apart. Make sure your grip is secure.
Step 5: Rise to Standing
Bring one foot forward (strongest leg) into a half-kneeling position. Push through the furniture and your front leg to rise to standing. Hold the furniture for 10-15 seconds to ensure you’re stable and not dizzy before walking.
From hands and knees with both hands on the furniture, step one foot forward between your hands. You’re now in a lunge or half-kneeling position: one knee down, one foot forward and flat on the floor. The forward foot should be far enough ahead that your shin is roughly vertical.
Press down hard through your hands on the furniture. Drive through the heel of your front foot. Straighten your front leg and push yourself up to standing. Keep holding the furniture with both hands until you’re fully upright.
Stand still. Don’t rush off. Give yourself fifteen to thirty seconds to make sure you’re not lightheaded. Orthostatic hypotension, a drop in blood pressure when standing, is common after lying on the floor. If you feel dizzy, sit down in the chair or on the bed edge and wait longer. This drop in blood pressure can be especially pronounced at night, so take extra time to stabilize if you’ve fallen after dark.
Once you’re steady, take a few careful steps while still holding the furniture. Only let go when you’re confident.
What to Do If You Can’t Get Up
- Call for help immediately (phone, alert device, calling out to a neighbor)
- Stay warm: pull a blanket, coat, or rug over yourself
- Shift positions every 15-20 minutes to prevent pressure injury
- Sip water if within reach
- Don’t try to force yourself up if you’re injured; wait for assistance
Lying on a hard floor for hours can cause pressure sores, especially over bony areas like the tailbone, shoulder blades, and heels. If you