Wall push-ups are the most accessible upper body strengthening exercise for seniors. They build the chest, shoulder, and tricep strength needed for pushing open heavy doors, getting up from the floor, lifting objects, and maintaining upper body independence. Unlike floor push-ups, which require significant wrist, shoulder, and core strength plus the ability to get on and up from the ground, wall push-ups can be performed by virtually anyone who can stand.
The exercise mimics the same movement pattern as floor push-ups but removes the barrier of getting down and up from the ground. You control the difficulty by adjusting how far your feet are from the wall. Close to the wall means easier. Further away means harder. This scalability makes wall push-ups suitable whether you’re starting from scratch or maintaining strength you’ve already built.
Before starting any new exercise program, talk to your doctor, especially if you have existing shoulder, wrist, or heart conditions.
Proper Wall Push-Up Form
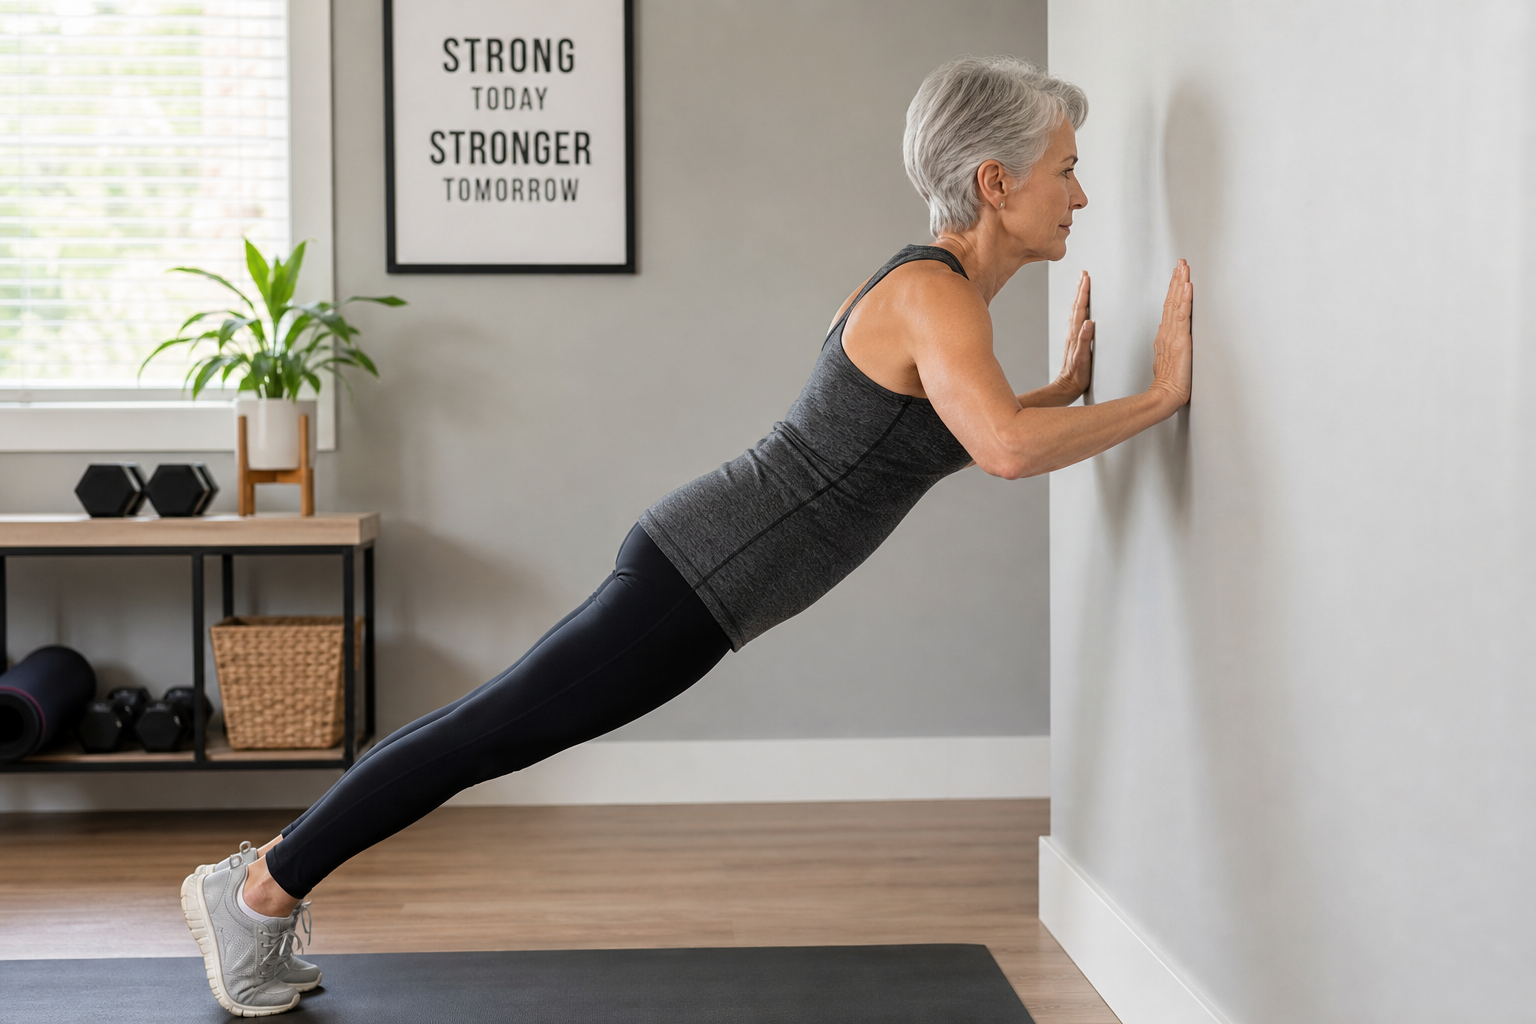
Setup
- Stand facing a wall at arm’s length. Extend your arms and place your palms flat on the wall at shoulder height, slightly wider than shoulder-width apart.
- Walk your feet back 12-18 inches from the wall. Your body should form a straight line from head to heels at a slight angle to the wall. The further your feet are from the wall, the harder the exercise.
- Your feet should be hip-width apart with toes pointing forward. Keep your heels on the floor throughout.
Take a moment to check your hand position. Your middle fingers should point straight up toward the ceiling. Palms pressed flat. If you draw an imaginary line between your hands, it should cross your chest at nipple level, not up at your collar bones.
The Movement
- Lower: Bend your elbows to bring your chest toward the wall. Keep your elbows at about 45 degrees from your body (not flared straight out to the sides and not pinned tightly against your ribs). Lower until your nose or forehead nearly touches the wall.
- Pause: Hold the bottom position for 1 second. This eliminates the bounce that steals the work from your muscles.
- Push: Press your palms into the wall and straighten your arms to return to the starting position. Exhale during the push phase.
Think about pressing the wall away from you rather than pushing yourself away from the wall. This mental cue helps engage the chest muscles properly. The push should feel smooth and controlled, not jerky or rushed.
Critical Form Points
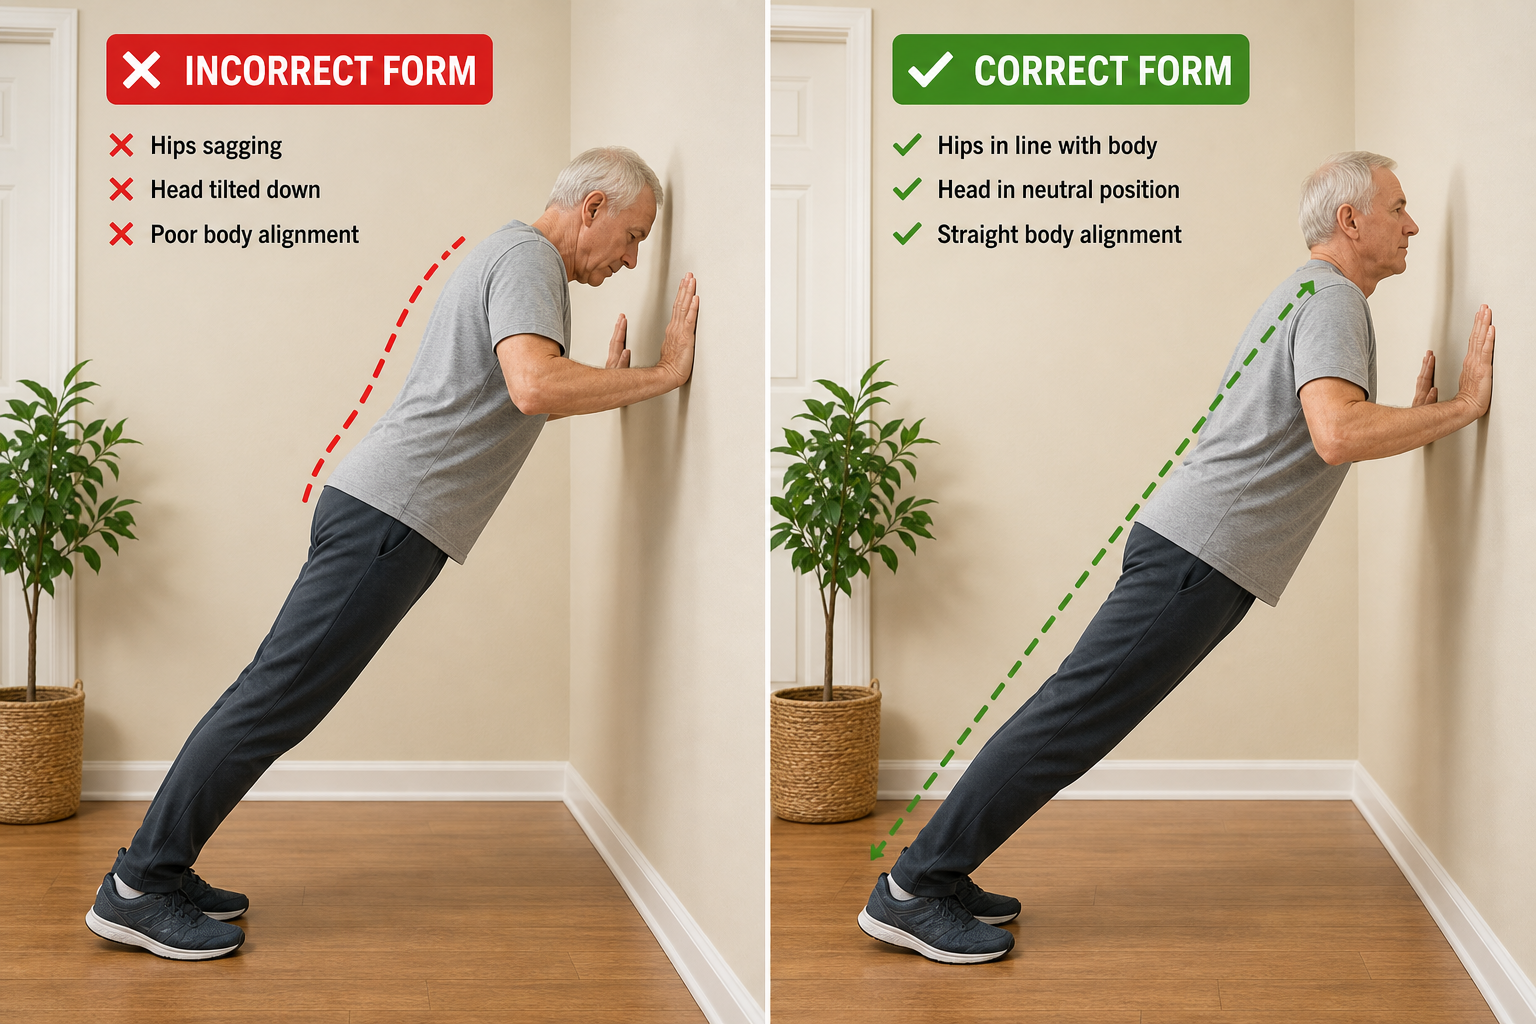
Keep your body rigid. Don’t let your hips sag toward the wall or your buttocks push backward. Your body should move as one unit, like a plank. Engage your core throughout. If you notice your hips moving independently from your shoulders, reset your position and consciously squeeze your glutes and abdominals before starting the next rep.
Neck stays neutral. Don’t crane your neck forward toward the wall or tuck your chin to your chest. Look at the spot on the wall between your hands. Your ears should stay roughly in line with your shoulders throughout the movement. Leading with your head is a common mistake that adds neck strain without any benefit.
Wrists stay flat. Your palms should be fully pressed into the wall with no gap under the heels of your hands. If this causes wrist pain, make loose fists and push with your knuckles instead. Another option: slightly angle your hands outward (fingers pointing away from each other at 10 and 2 o’clock instead of straight up). This small rotation can relieve wrist discomfort for some people.
Control the entire movement. Lower for 2-3 seconds, pause for 1 second, push for 1-2 seconds. No bouncing, no dropping, no rushing. The eccentric (lowering) phase is where much of the strength-building happens. Dropping quickly to bounce back up cuts that benefit in half.
Breathe consistently. Inhale as you lower. Exhale as you push. Don’t hold your breath. Holding your breath during exertion raises blood pressure unnecessarily and can make you dizzy.
Progression Path
Level 1: Close to the Wall (Easiest)
Feet 12 inches from the wall. Perform 3 sets of 10 repetitions. This is the starting point for anyone new to push-ups or returning after a long break. When 3 sets of 15 feels easy and controlled, progress to Level 2.
At this level, you’re supporting roughly 10-15% of your body weight with your arms. The movement should feel manageable but not trivial. If even this feels too hard, stand even closer, just 6-8 inches from the wall. There’s no shame in starting easier. You’ll progress faster from an appropriate starting point than from one that’s too difficult.
Level 2: Further from the Wall
Move feet to 18-24 inches from the wall. The increased angle puts more of your body weight through your arms. Perform 3 sets of 10. Progress when 3 sets of 15 is comfortable.
You’re supporting approximately 20-25% of your body weight at this distance. The balance component increases slightly. Your core has to work harder to keep your body straight. You may notice your legs engaging more to maintain the position.
Level 3: Counter Push-Up
Place your hands on a kitchen counter, bathroom vanity, or other sturdy surface at about waist height. This is a significant jump in difficulty from the wall version because the angle is much steeper. Perform 3 sets of 8-10.
Make absolutely certain the surface is stable. Test it first by pressing down firmly with both hands. Counters that overhang their base cabinets can sometimes tip if you press on the very edge. Use the portion of the counter directly over the cabinet structure. At this angle, you’re supporting around 35-40% of your body weight.
Level 4: Chair or Step Push-Up
Hands on the seat of a sturdy chair or a low step. This approaches the difficulty of a floor push-up while still being elevated enough to reduce wrist strain. 3 sets of 8-10.
The chair must not slide. Place it against a wall or on a rug. Better yet, use a weight bench or piano bench if you have access to one. At seat height (roughly 18 inches), you’re supporting about 50-55% of your body weight. This is substantially harder than the counter version.
Level 5: Floor Push-Up (Advanced)
Standard push-up on the floor. Most seniors don’t need to reach this level for functional fitness. The counter and chair versions provide sufficient upper body strength for daily activities.
Floor push-ups support your full body weight minus whatever your toes bear (typically 60-70% of your weight). They also require the mobility to get down to the floor and back up safely. If you can do counter push-ups comfortably, you already have the pressing strength needed for nearly every daily task.
Muscles Worked
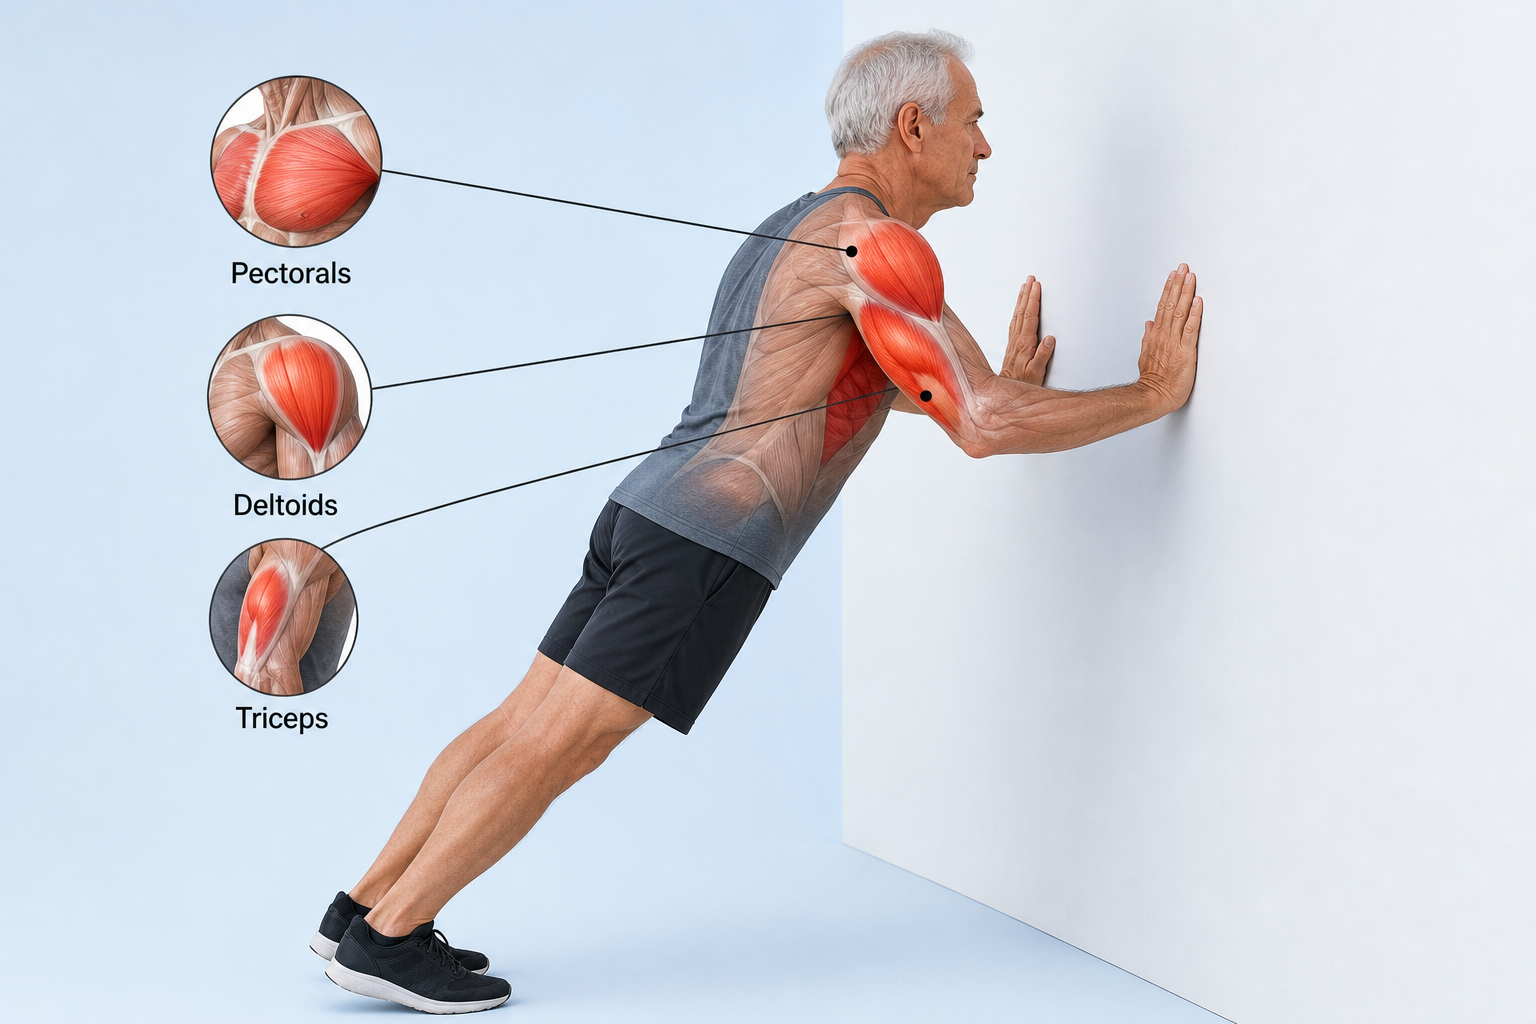
Pectorals (chest): Primary movers that push your body away from the wall. The pecs provide the bulk of the force in the push-up movement. Strengthening them makes pushing heavy shopping carts, opening stiff car doors, and lifting objects away from your body easier.
Anterior deltoids (front shoulders): Assist the chest during the push. These muscles also lift your arms forward and overhead, so strengthening them helps with reaching into high cabinets and putting dishes away.
Triceps (back of upper arm): Straighten the elbow during the push phase. Strong triceps are critical for pushing yourself up from a chair, pushing up from the floor if you fall, and any overhead pressing motion.
Core (abdominals and lower back): Stabilize your body in the plank position throughout. Wall push-ups are a moving plank, which means your entire torso works to prevent your body from sagging or bending. This translates directly to better posture and reduced lower back strain during daily activities.
Serratus anterior (side of ribcage): Stabilizes the shoulder blade against the ribcage during pushing. Weakness here causes the shoulder blades to “wing” out from your back during push-ups and other pushing movements. Strengthening the serratus improves shoulder mechanics and reduces injury risk.
Common Mistakes and How to Fix Them
Bouncing off the wall. This turns the exercise into a plyometric movement, which reduces the muscle-building stimulus and increases injury risk. Fix: consciously pause for a full second at the bottom. Count “one-thousand-one” before pushing back.
Sagging hips. Your lower back arches and your hips drift toward the wall ahead of your shoulders. This usually means your core isn’t engaged or the angle is too challenging. Fix: squeeze your glutes and pull your belly button toward your spine before each rep. If it persists, move closer to the wall.
Flared elbows. Your elbows point straight out to the sides at 90 degrees from your body. This stresses the shoulder joint and reduces chest activation. Fix: imagine tucking your elbows slightly toward your body as you lower. They should track at roughly 45 degrees.
Head jutting forward. Your head reaches for the wall while your chest is still several inches away. This adds neck strain. Fix: pick a spot on the wall between your hands and keep your eyes on it. Your forehead should touch the wall at the same time your chest would.
Incomplete range of motion. You’re lowering only a few inches before pushing back. This limits strength gains. Fix: aim to get your nose within 2-3 inches of the wall. If you can’t reach that depth without form breakdown, move closer to the wall.
Rushing the reps. You’re pumping out repetitions as fast as possible. Speed reduces effectiveness and increases injury risk. Fix: count deliberately. Three seconds down, one second pause, two seconds up. Each rep should take 6 seconds minimum.
Variations for Specific Goals
Wide Grip (More Chest)
Place hands wider than shoulder width. This increases the stretch on the chest muscles and emphasizes chest development over triceps.
How wide? Roughly 4-6 inches outside shoulder width on each side. Going wider than that shifts stress onto the shoulder joint without additional benefit. The wide grip version feels noticeably different in the chest at the bottom of the movement. You should feel a stretch across the pectoral muscles that the standard grip doesn’t provide.
Narrow Grip (More Triceps)
Place hands closer together (directly in front of the shoulders or narrower). This shifts emphasis to the triceps, building the arm strength needed for pushing up from chairs and pushing heavy objects.
The extreme version is a diamond push-up (thumbs and index fingers touching to form a diamond shape), but that’s unnecessarily difficult for most seniors. Instead, place your hands 6-8 inches apart. This provides plenty of tricep emphasis while remaining achievable.
Alternating Hand Height
Place one hand 6-8 inches higher on the wall than the other. Perform your reps, then switch which hand is higher. This creates a slight rotation through the torso, engaging the obliques more than the standard version. It also trains the body to handle uneven pushing forces, which happens frequently in real life.
Single-Arm Wall Push-Up (Advanced)
Place one hand on the wall and the other behind your back. Stand close to the wall (this is hard). Perform the push-up with one arm. This builds significant single-arm pressing strength and core anti-rotation stability. Only attempt after mastering the standard version.
Single-arm wall push-ups require your core to work hard to prevent your torso from rotating toward the working arm. Start with your feet only 8-10 inches from the wall. Even strong individuals find single-arm wall push-ups challenging. Work up to 3 sets of 8 per arm before considering progression to a lower surface.
Tempo Wall Push-Ups
Slow the movement down deliberately. Five seconds to lower, two second pause, three seconds to push back up. Each rep takes 10 seconds. This dramatically increases time under tension, which builds strength and muscle endurance even at easy angles. Three sets of 6-8 tempo reps can be harder than 3 sets of 15 at regular speed.
Programming Wall Push-Ups into Your Routine
Frequency matters more than volume. Three to four sessions per week is ideal. Daily wall push-ups don’t allow adequate recovery time for the muscles to adapt and strengthen. Muscles grow during rest, not during the workout.
Sample weekly schedule:
- Monday: 3 sets of 12-15 reps at your current level
- Wednesday: 3 sets of 10-12 reps, one level harder than Monday (if available)
- Friday: 3 sets of 12-15 reps at your current level
- Sunday: Optional additional session if you feel fully recovered
Pair wall push-ups with pulling movements for balanced upper body development. Doorway rows (holding the sides of a doorframe and leaning back) or resistance band rows work well. Push-pull balance prevents rounded shoulders and maintains healthy shoulder mechanics. For those focused on preventing or managing posture issues, combining pushing and pulling exercises is particularly beneficial.
Track your progress. Write down how many reps you completed at what distance from the wall. When you hit 3 sets of 15 comfortably two workouts in a row, progress to the next level. Progression might be adding 2 inches of distance from the wall or moving to the next surface height (wall to counter, counter to chair). If you want to track your workouts digitally, consider using one of the fitness tracking apps designed for seniors.
Frequently Asked Questions
How many wall push-ups should I do per day?
Three sets of 10-15 repetitions, 3-4 times per week, provides an effective upper body stimulus. You don’t need to do them daily. Allow 48 hours between sessions for muscle recovery. As you get stronger and progress to harder variations, the number of reps may decrease while the benefit per rep increases.
More isn’t always better. Six sets of wall push-ups won’t build strength twice as fast as three sets. You’ll just accumulate fatigue that interferes with recovery. The body adapts to exercise during rest periods, not during the exercise itself. Think of the workout as the stimulus and the rest days as when the actual strength building happens.
Can wall push-ups build real strength?
Yes. For seniors who haven’t done upper body training, wall push-ups produce measurable strength gains within 4-6 weeks. The push-up pattern (horizontal pressing) is one of the most functional movement patterns, used dozens of times daily for pushing, lifting, and getting up. As you progress through the levels, the challenge increases and so do the strength gains.
Studies on progressive resistance training in older adults show that the angle and load matter less than consistent progressive overload. Starting at the wall and progressing to a counter over several months builds the same strength adaptations as starting at a counter and progressing to the floor would. Your muscles don’t know whether you’re pushing against a wall or the ground. They only know they’re working against resistance that challenges them.
What if I have shoulder pain during wall push-ups?
Reduce your range of motion (don’t lower as far). Keep your elbows at 30-45 degrees from your body (not